AQS Block by Block Basics: Fish Block sponsored by AccuQuilt
- By American Quilter's Society
- Aug 19, 2025

Welcome to the AQS Block by Block Basics Series sponsored by AccuQuilt! Each month, we'll spend three weeks playing with one block.
Week one, we'll kick things off with hand piecing from templates like the quilters of yesterday.
For week two, we'll use the AccuQuilt Cutting System and machine-piece the blocks with a focus on precision piecing.
Finally, in week three, we'll focus on making the block fabulous with a variety of embellishment techniques.
Be sure to join our AQS Quilting Project Parade Facebook Group to sew along with other quilters, ask questions, and share your progress.
If you missed the first blocks in the series, check them out by clicking the name:
Fish Block
12" x 12" finished block size
Week One: Template cutting and hand piecing
Week Two: AccuQuilt cutting and precision machine piecing
Week Three: Embellishment fun
Each month, we'll complete two blocks, one hand pieced and one machine pieced. You can finish one or both of the blocks to make mini quilts or use them in projects. We'll have lots of creative ideas along the way for using your 12" blocks. We'll also offer finishing instructions if you prefer to save all the blocks for a quilt.
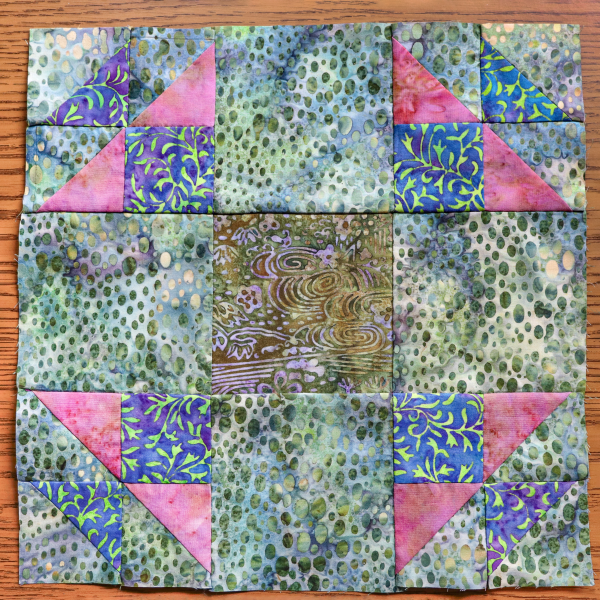
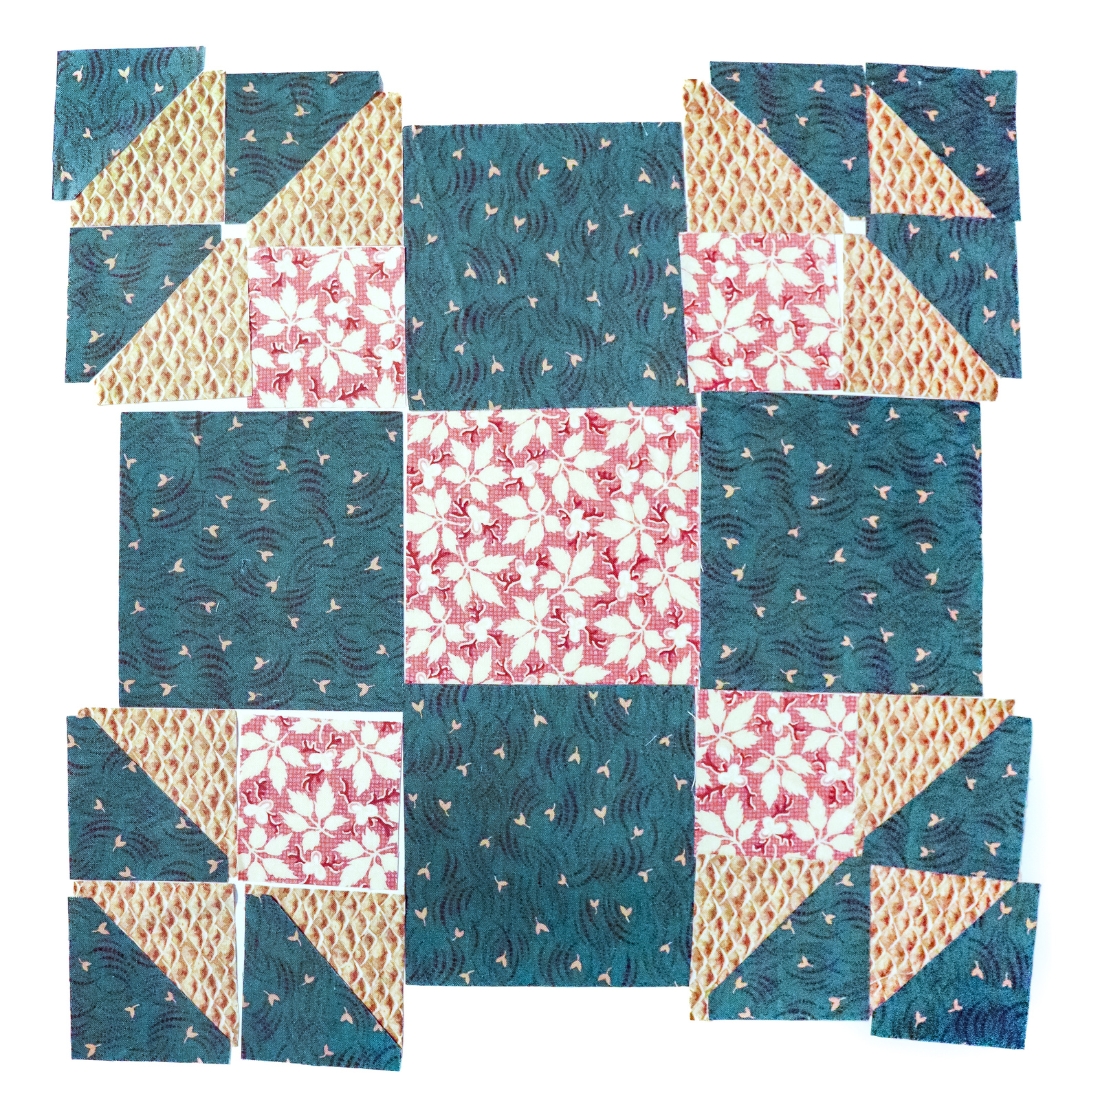
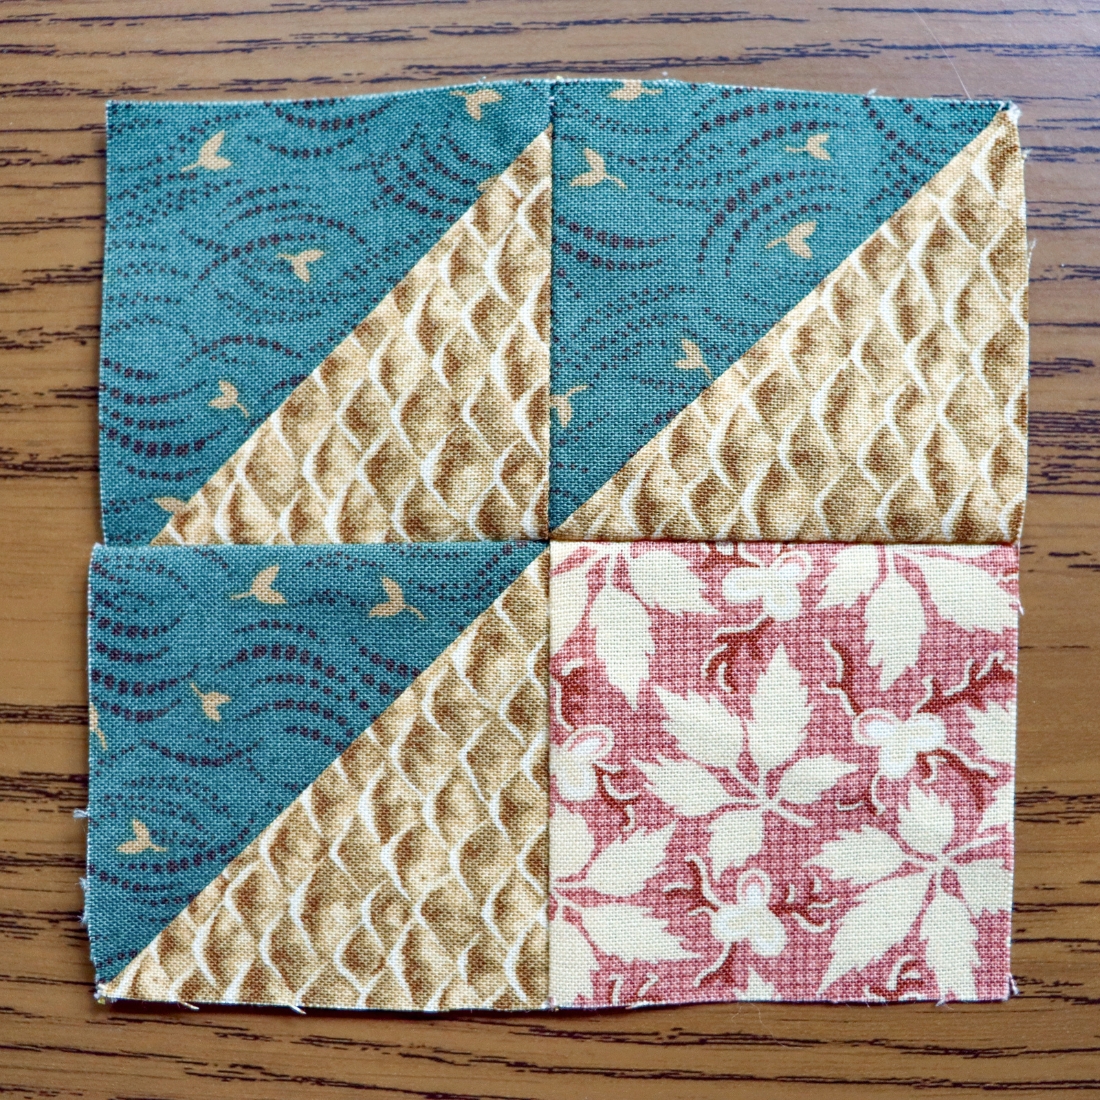
This month’s block, Fish, features half square triangles, and follows the same structure as a nine-patch.
“Since I was young, I have loved spending time near the water. I especially love to fishwatch because I feel awed that I can live such a different experience from another creature which shares the same world as me. It’s a bit like peoplewatching, but I find it far more mysterious and evocative. Making this block, I tried to capture the peaceful liveliness of the creeks I grew up in and the fishes I’ve met there.” -Emily Cross, Ozark Modern Crafting
Week One
Template Options
Follow the steps from our first month (click here to visit the first tutorial) to make the three templates needed for this month's Fish block.
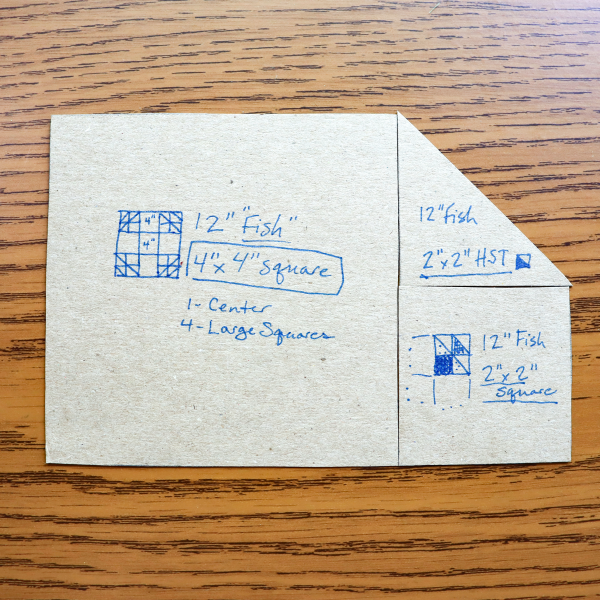
You need the following templates, and note you may have made some of these previously for other blocks in the series:
(1) 4" x 4" square
(1) 2" x 2" square
(1) 2" x 2" square, subcut diagonally once to make a half square triangle (HST)
Then, following the color layout you like*, mark patches out as listed below:
- A Fabric - Fish Fins
- (8) 2" x 2" HST
- B Fabric - Fish Squares & Center Square
- (1) 4" x 4" square
- (4) 2" x 2" squares
- C Fabric - Background
- (4) 4" x 4" squares
- (12) 2" x 2" HST
*Note: More fabrics are used in the example block than listed in the pattern. Try your own variations!
Remember, these are finished sizes and don't include the seam allowances. Be sure to label your templates so it's easy to find the right size when you need it!
Select your fabric, and start tracing. If last month was your first time hand piecing, you'll have a pretty good idea of how much seam allowance you want. We cut our pieces this week using the AccuQuilt Go! Cutter, so we’re working with a scant quarter inch this time. The tighter weave of the batik makes this easy as it’s a low-fraying fabric.
If this is your first try, here's some important info you shouldn't miss:
Seam allowances are different for hand piecing. They don't serve as a guide for accuracy, rather, they exist so the fabric doesn't fray too much while you sew. If you're new to hand piecing, give yourself some extra room. You can always trim them down later. DO NOT CUT ON THE DRAWN LINE - it's tempting, but don't do it.
Step one: Select the fabrics for the block. Each “card” can be different colors, some can match or coordinate like two colors and a background. You can do anything you want, anytime with your block, that’s the best part!
Step two: Trace the template on the backside of the fabric, leaving enough room between the patches for the seam allowances (a 1/4" or so for each patch is preferred for the seam allowance, but it's not a rule for hand piecing - you'll learn what you like best).
Step three: Cut out the patches, leaving enough fabric outside the drawn line for a seam allowance.
Hand Piecing
Previously, we covered the Quilter's Knot, the Tailor's Lock Stitch, and the End Knot. If you missed it, you can catch up here.
Hand piecing Fish uses all the same techniques as you used for the previous blocks to create half square triangle units.
Half Square Triangle Units
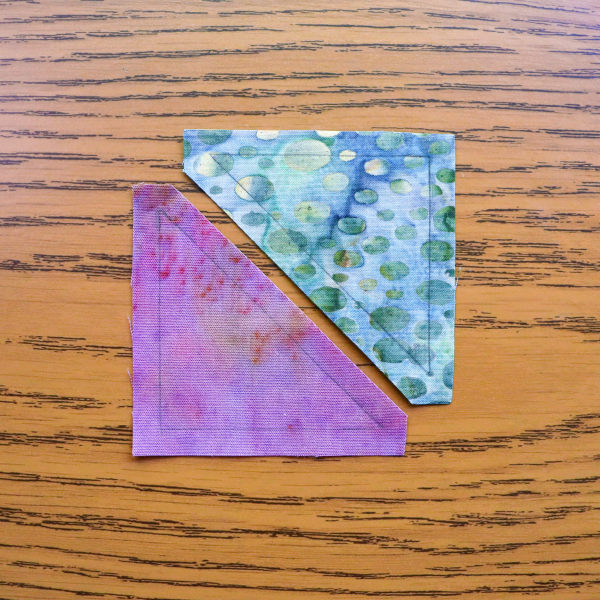
Line up the half square triangle patches right sides together and pin. Take care not to stretch the material too much across the bias of the fabric. Sew a 1/4" seam.
Again, remember not to sew into the seam allowances, just corner to corner.
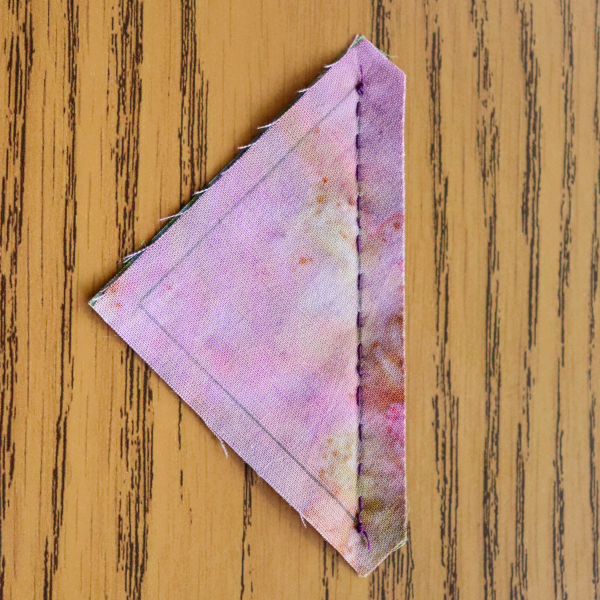
Finger press the HST unit. The unit measures 2½" x 2½" square, unfinished. Repeat to make 12 HST units.
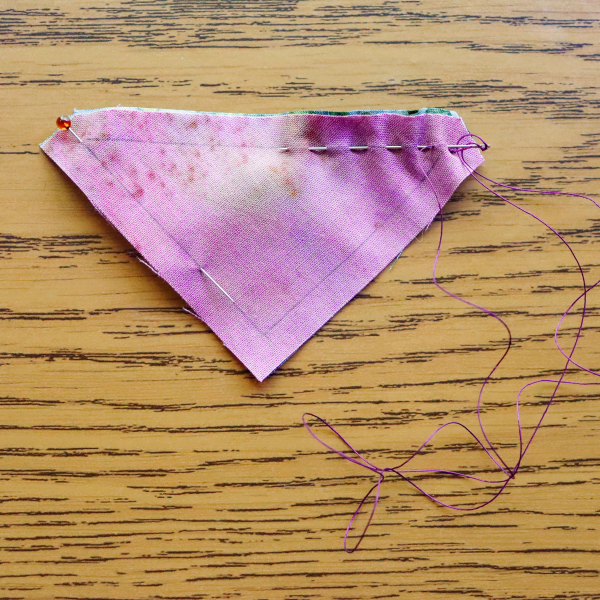
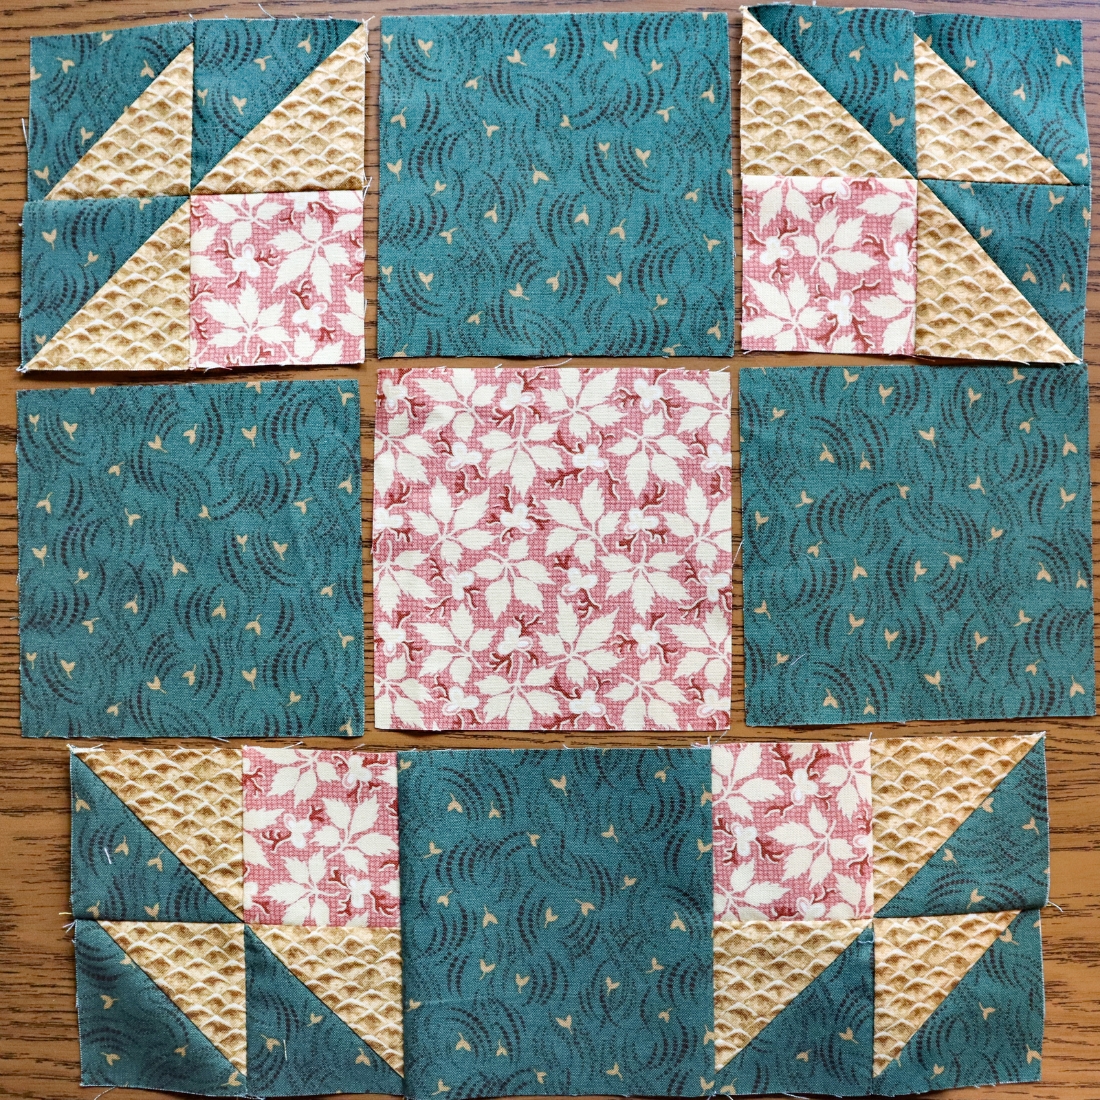
Fish Unit Assembly
Using the HSTs and the 2½" x 2½" squares from Fabric B, lay out a Fish unit.

Sew them into pairs: two HST, and an HST with a square. Then sew the pairs together into a Fish unit. Do not sew through seams, but pass through them.*
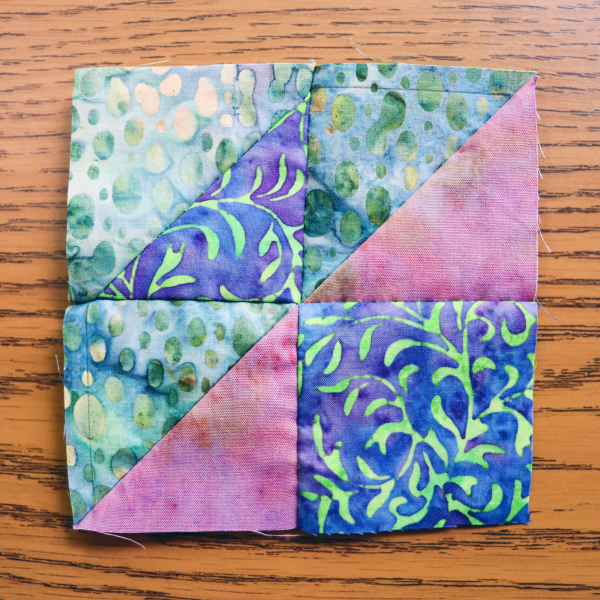
Finger press the Fish unit. The unit measures 4½" x 4½" square, unfinished. Repeat to make 4 Fish units.
*Below is a refresher on how to pass through the seam when hand piecing.
Passing Through the Seam
Step one: When you come to a seam, take a back stitch on the marked line, right up to the seam.
Step two: Pass the needle through the seam on the same side you are stitching from, above the seam's stitches. If you pass the needle below the seam's stitches, your stitch will show on the front of your block.
Step three: Once on the other side of the seam, take a stitch forward and then backstitch over this stitch to continue.
Piecing Fish Block
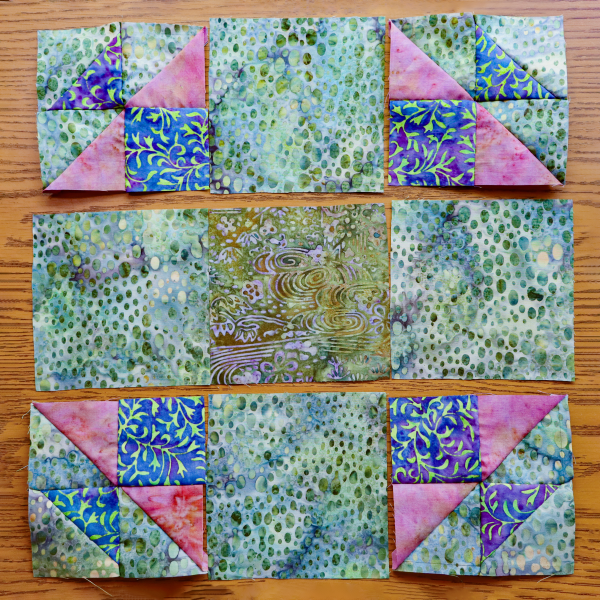
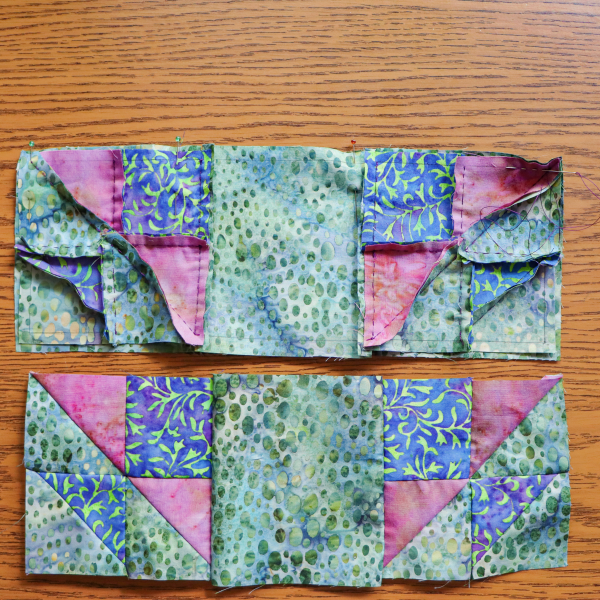
Arrange the units and patches as shown above and sew together into three rows. Make sure to pass through the seam at intersections.
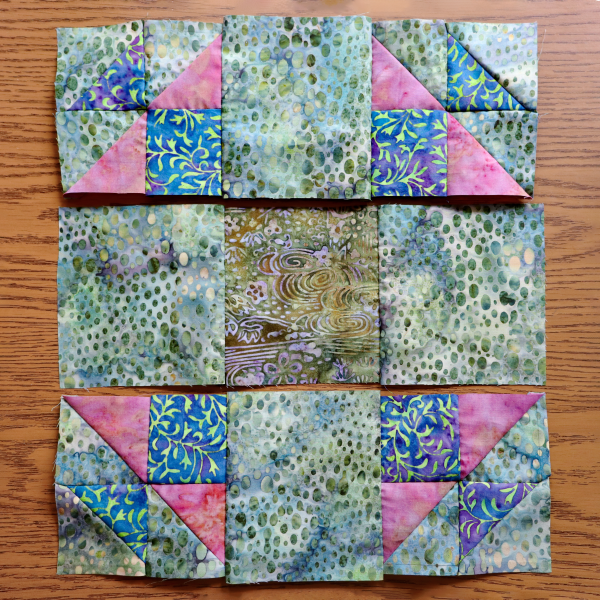
Sew the rows together into the block.
Fish block measures 12½” square, unfinished.

Week Two
Welcome to week two of the AQS Block by Block Basics Series sponsored by AccuQuilt! For week two, we'll use the AccuQuilt Cutting GO! to die cut the fabric, and then we’ll machine piece the blocks with a focus on precision piecing.
Be sure to join our AQS Quilting Project Parade Facebook Group to sew along with other quilters, ask questions, and share your progress.
Download the free 12" Fish block pattern from AccuQuilt here.
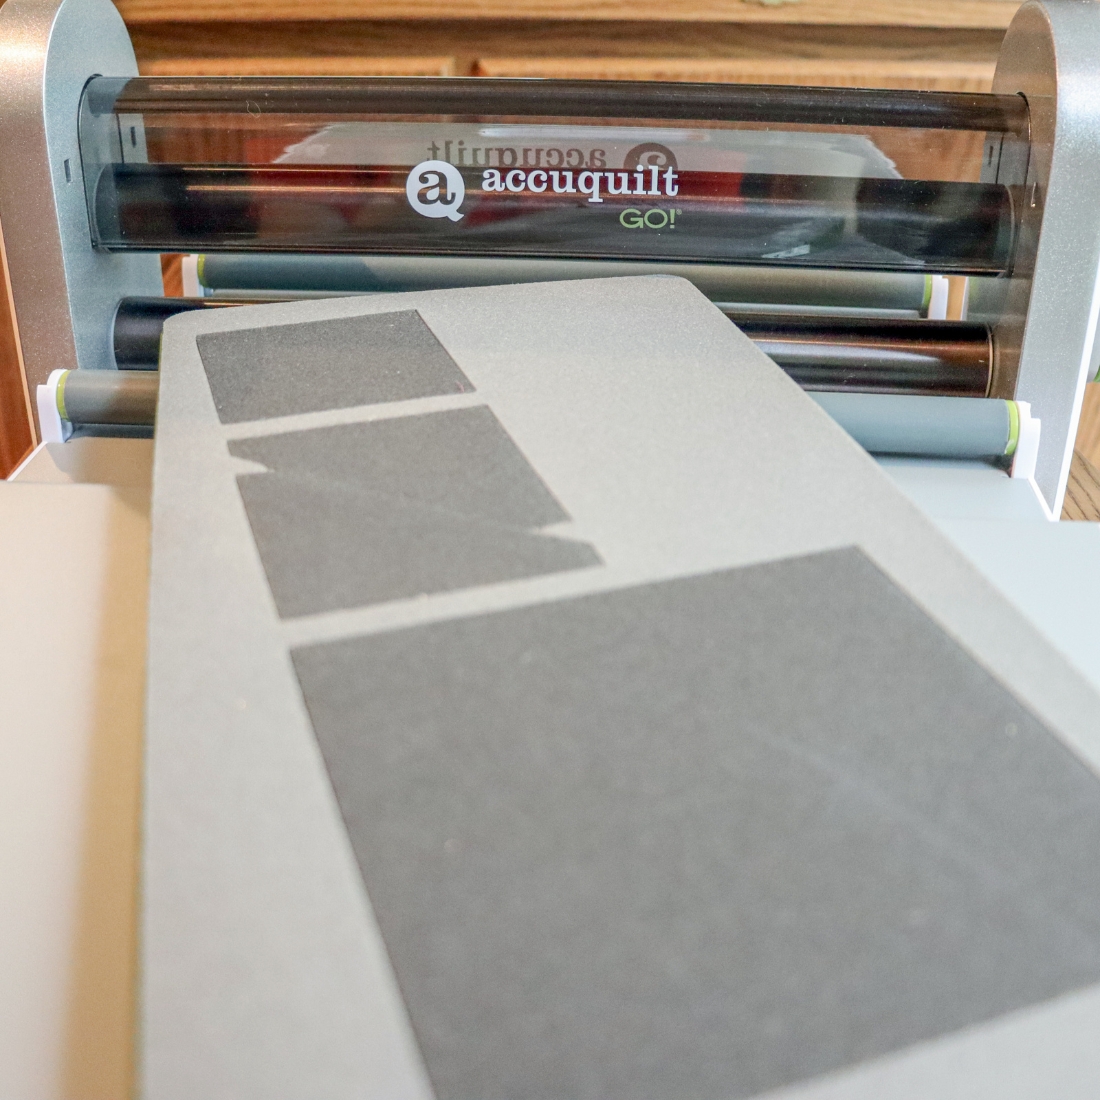
Cutting with the AccuQuilt GO!
Supplies for Cutting with the AccuQuilt GO!
Download the free 12" Fish block pattern from AccuQuilt here.
Small scissors to cut threads, if needed
Dies Used:
GO! Half Square Triangle - 2" Finished Triangle (55063 or 55018) - Fish HST
GO! Square - 2 ½" (2" finished) (55059 or 55018) - Fish Square
GO! Square - 4 ½" (4" finished) (55060 or 55018) - Large Squares
Fabric:
- Fabric A—1⁄8 yard
- Fabric B—1⁄4 yard
- Fabric C (Background) —1⁄4 yard
If you need a refresher on the cutting process using the AccuQuilt Cutting System, visit our tutorial here.
To make a block, cut out:
Fabric A - (12) Fish 2” HST
Fabric B - (4) Fish 2” Squares
(1) Large 4” Square
Fabric C - (12) Fish 2” HST
(4) Large 4” Squares
Machine Piecing
Machine piecing is rich with a variety of techniques and tricks for assembly. If you have any trouble figuring it out or have questions, visit the AQS Quilting Project Parade Group on Facebook. We'll be happy to show you how.
Machine Piecing Supplies
Download the free 12" Fish block pattern from AccuQuilt here.
- Sewing machine
- Thread
- Scissors
- Fabric
Fish Units
Construction Steps:
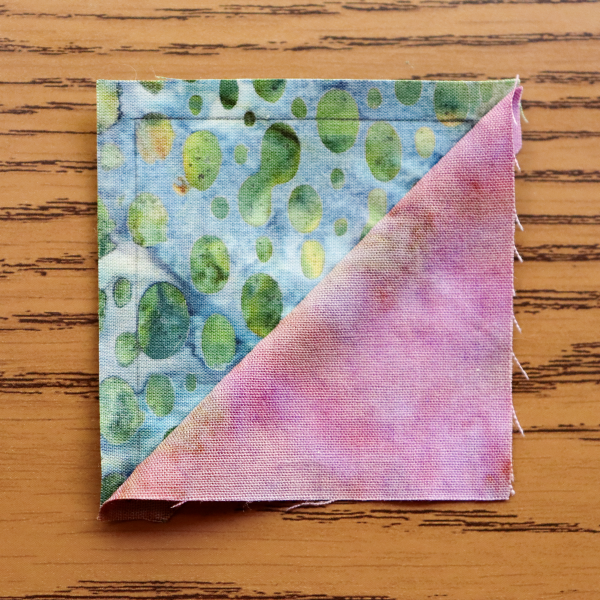
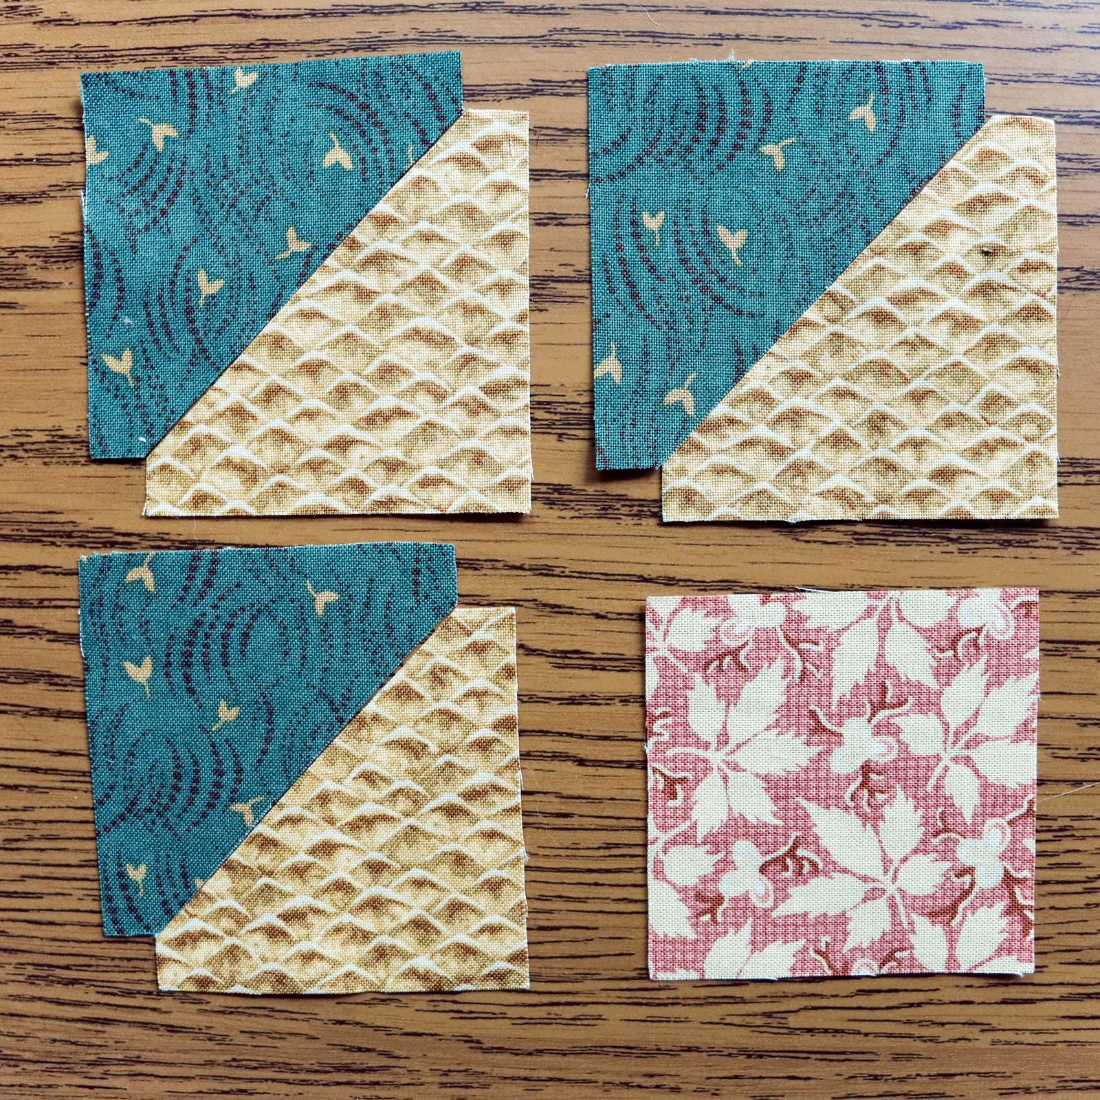
Line up a Fish half square triangle patch from Fabric A & Fabric C right sides together. Sew a ¼" seam along the diagonal edge, and press. Repeat to make 12 HST.
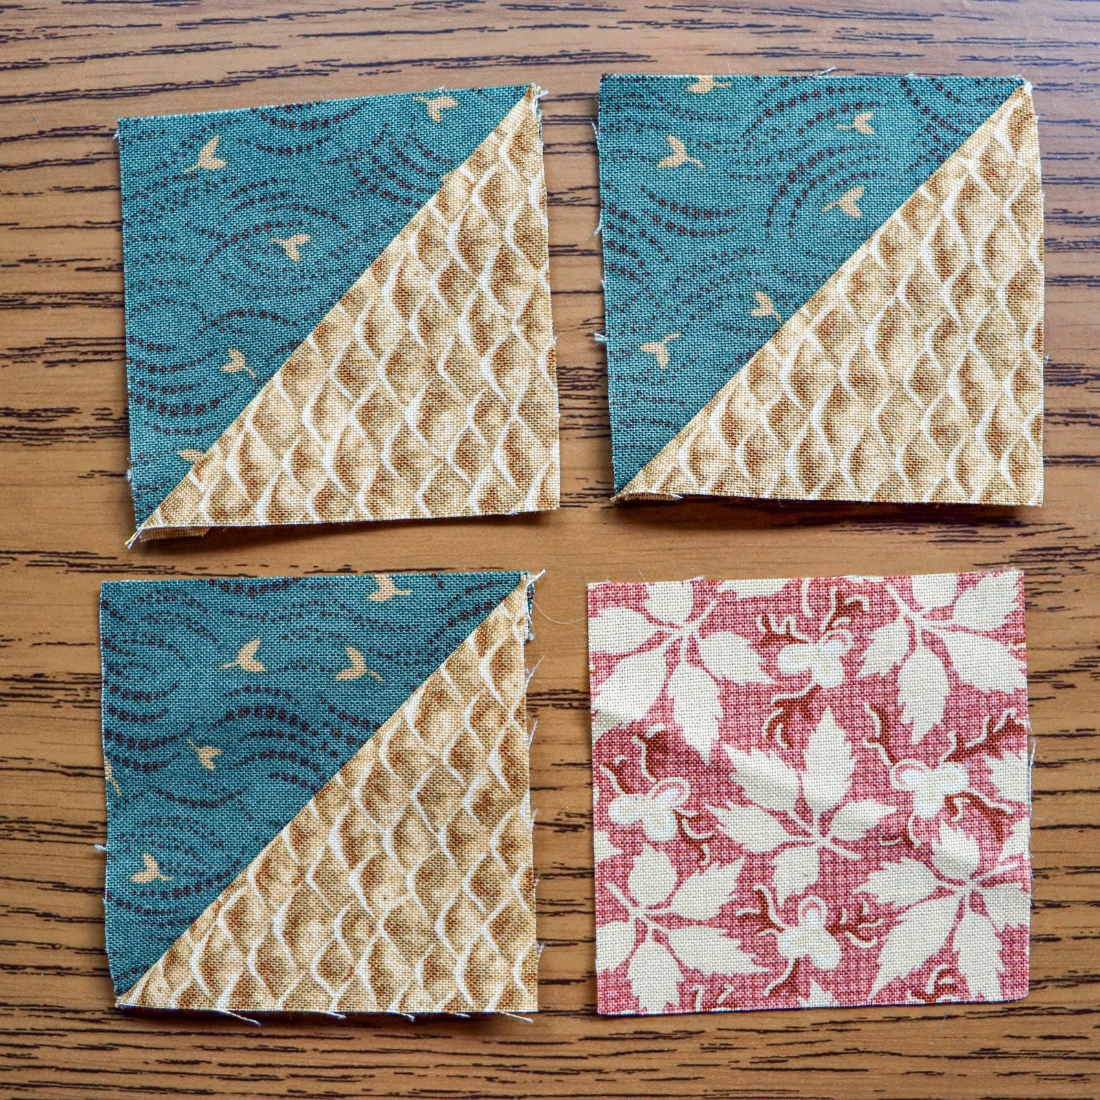
Arrange three HST and a Fish square from Fabric B as shown above. Sew two HST together into a pair, and then sew an HST and a square together into a row, as shown below.
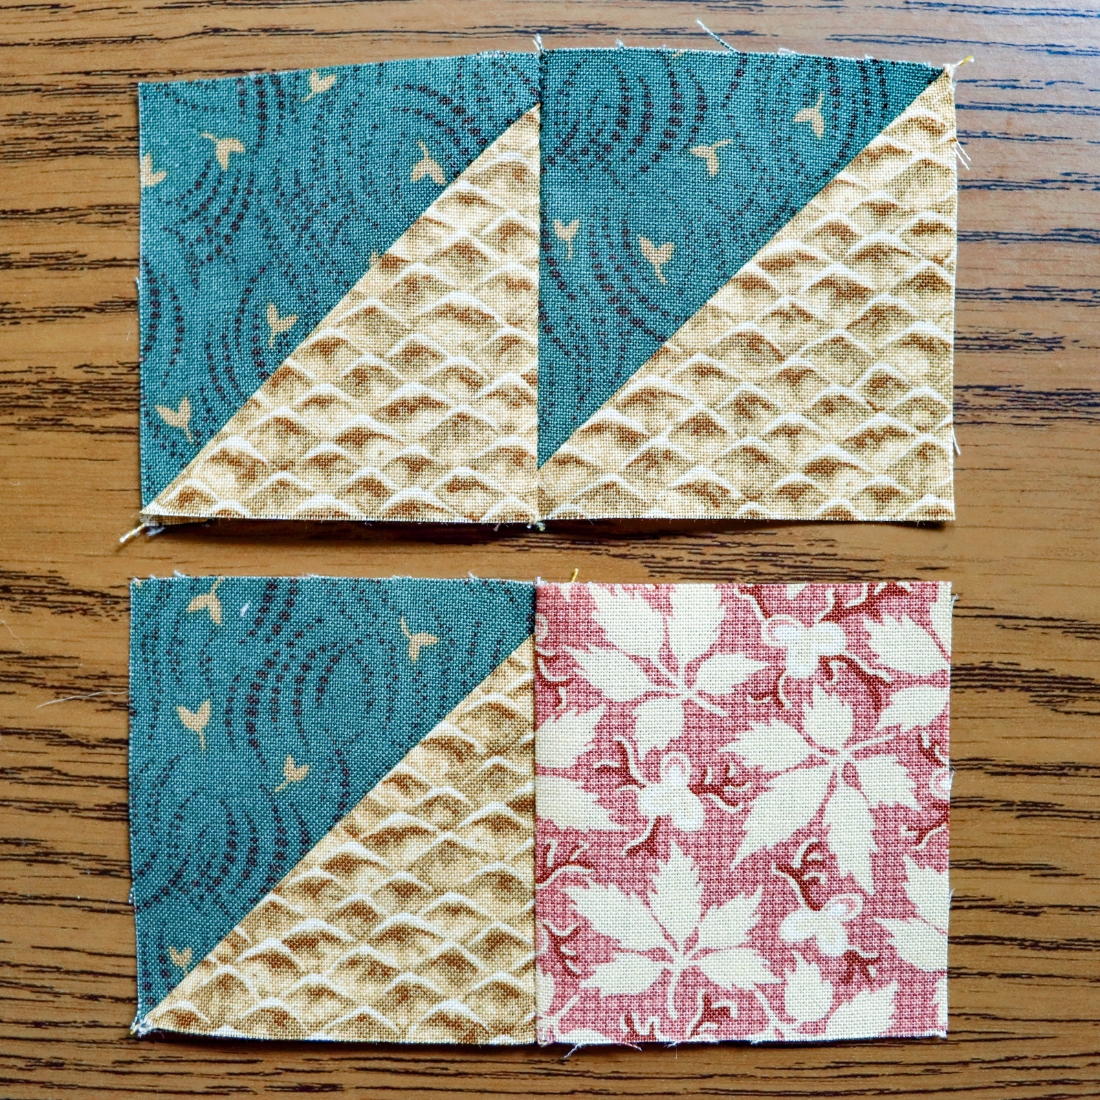
Sew the pairs together, and press.
The unit measures 4½" x 4½" unfinished. Repeat to make 4 units.
Block Assembly
Lay out the block using the Fish units, and the Large Squares from Fabric B & Fabric C, arranged as shown above. Sew the patches and units together into three rows and press, as shown below.
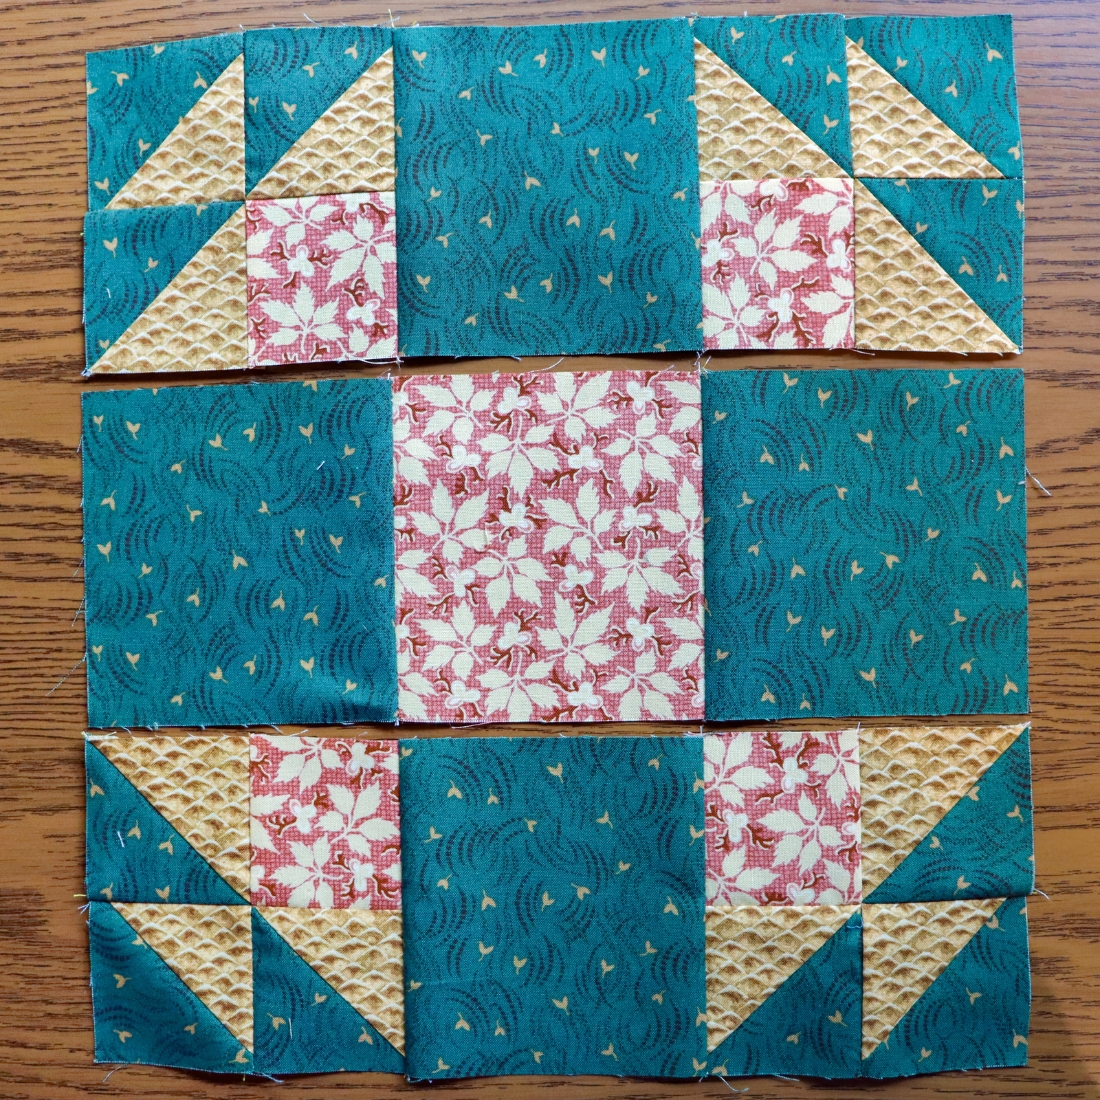
Sew the rows together into the block, and press final seams.

The block should measure 12 ½" square, unfinished (12" finished size).
Be sure to stop by the AQS Quilting Project Parade Group on Facebook to show off your finished blocks.
Week Three
Welcome to week three of making the Fish block as part of the AQS Block by Block Basics Series sponsored by AccuQuilt! For week three, we're exploring the couching stitch
In the months ahead, we'll explore many techniques, including some for various finishing options. Have fun combining and building upon each month's embellishment techniques as it goes.
Be sure to join our AQS Quilting Project Parade Facebook Group to sew along with other quilters, ask questions, and share your progress.
Couching Stitch Embellishment Fish
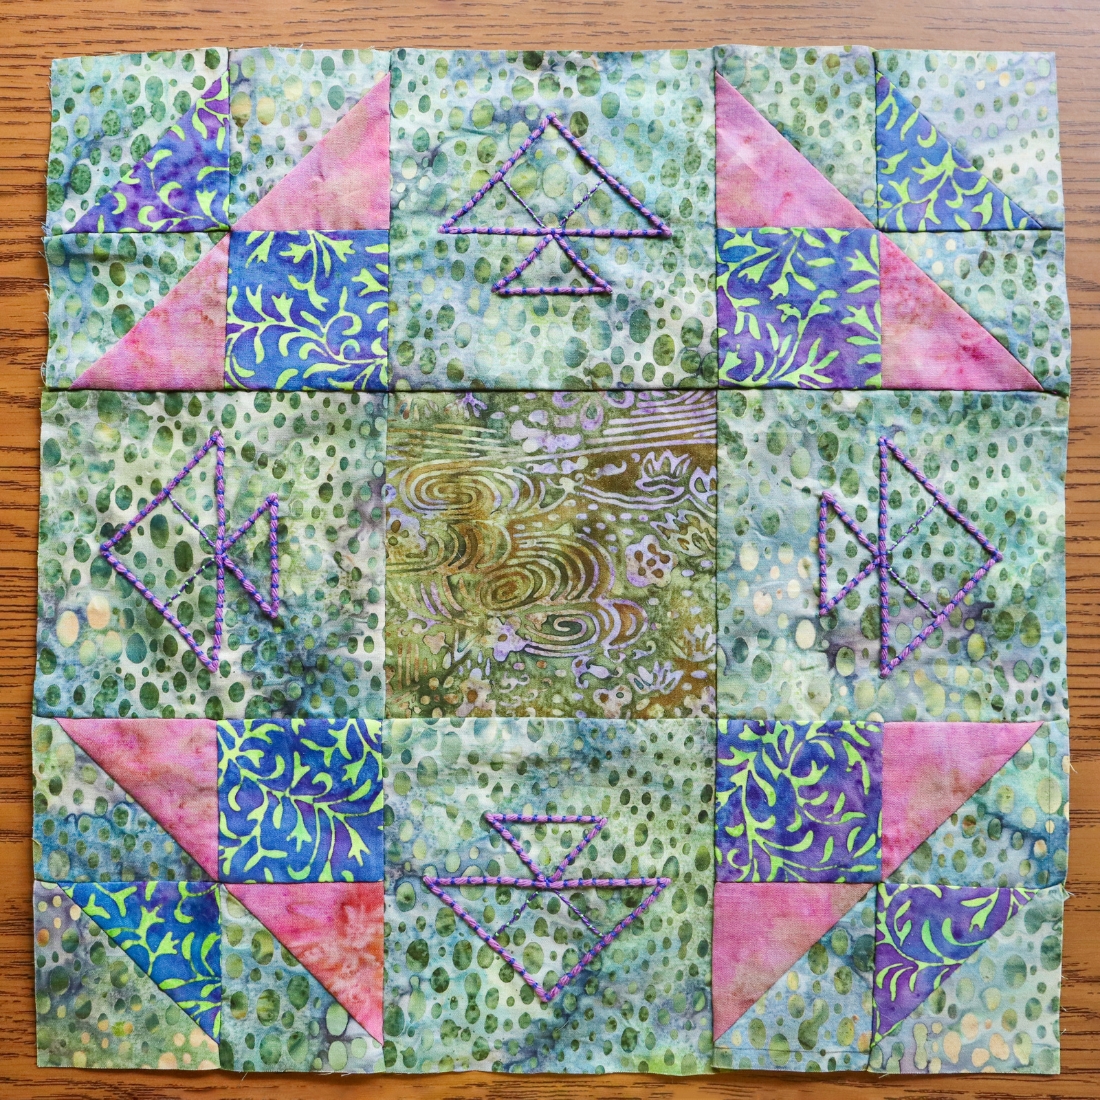
We’re diving into an embellishment technique that dates back to tapestries and crosses cultures across the globe: couching. Most simply, a yarn or other material is laid across fabric and secured by another thread with stitches that go over the laid material. It can be used for outlines and fills, and opens itself up to endless variations. - Emily Cross, Ozark Modern Crafting
Supplies
- Yarn or ribbon or ric rac or thick thread, or thin strips of fabric
- Embroidery floss or thread
- A 12” (finished size) quilt block
- Large, sharp needle - thick enough to pull yarn through fabric
- Embroidery needle
- Small scissors
- Template material (optional)
- Ruler (optional)
- Marking pencil (optional)
Instructions
Choosing Materials & Planning
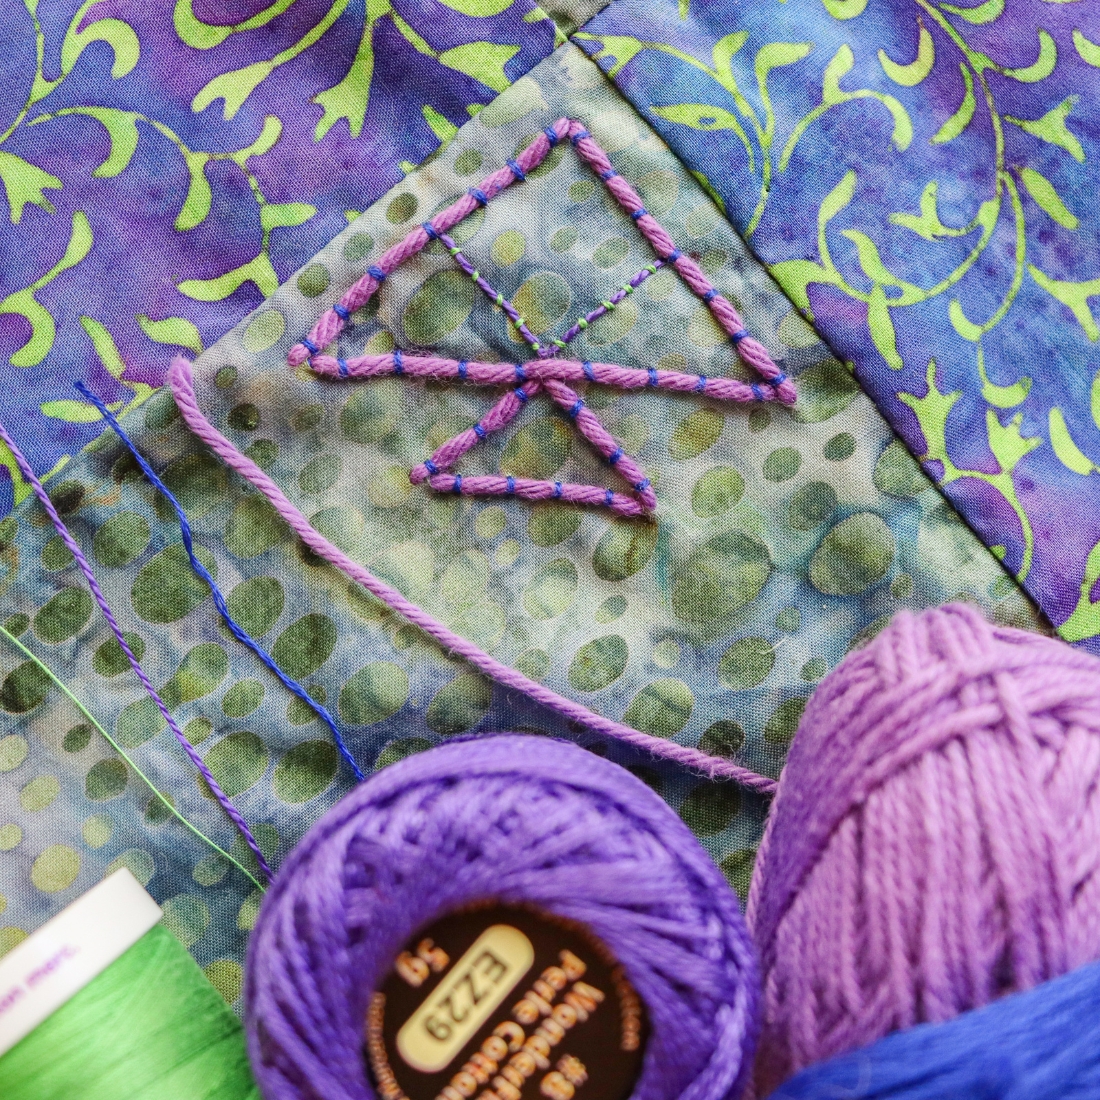
I knew I wanted to add some more fish to the batik colorway of the Fish block I made in week 1. So I used some scraps to make myself a little tester piece. Then I started looking in my yarn, floss, and thread collection for options in the color family of the block itself. I pulled options of different weights and colors to test stitch. I would roll out a bit of thread or yarn and hold it against the fabric, against the block, and against one another, ruling options out as I compared.
Once I narrowed it down, I mocked up a little version of the motif I was imagining. This helped me settle on combinations and make choices like how far apart did I want the couching stitches to be? Which shapes were important, and in what order did I want to stitch the motif to make those shapes clear?
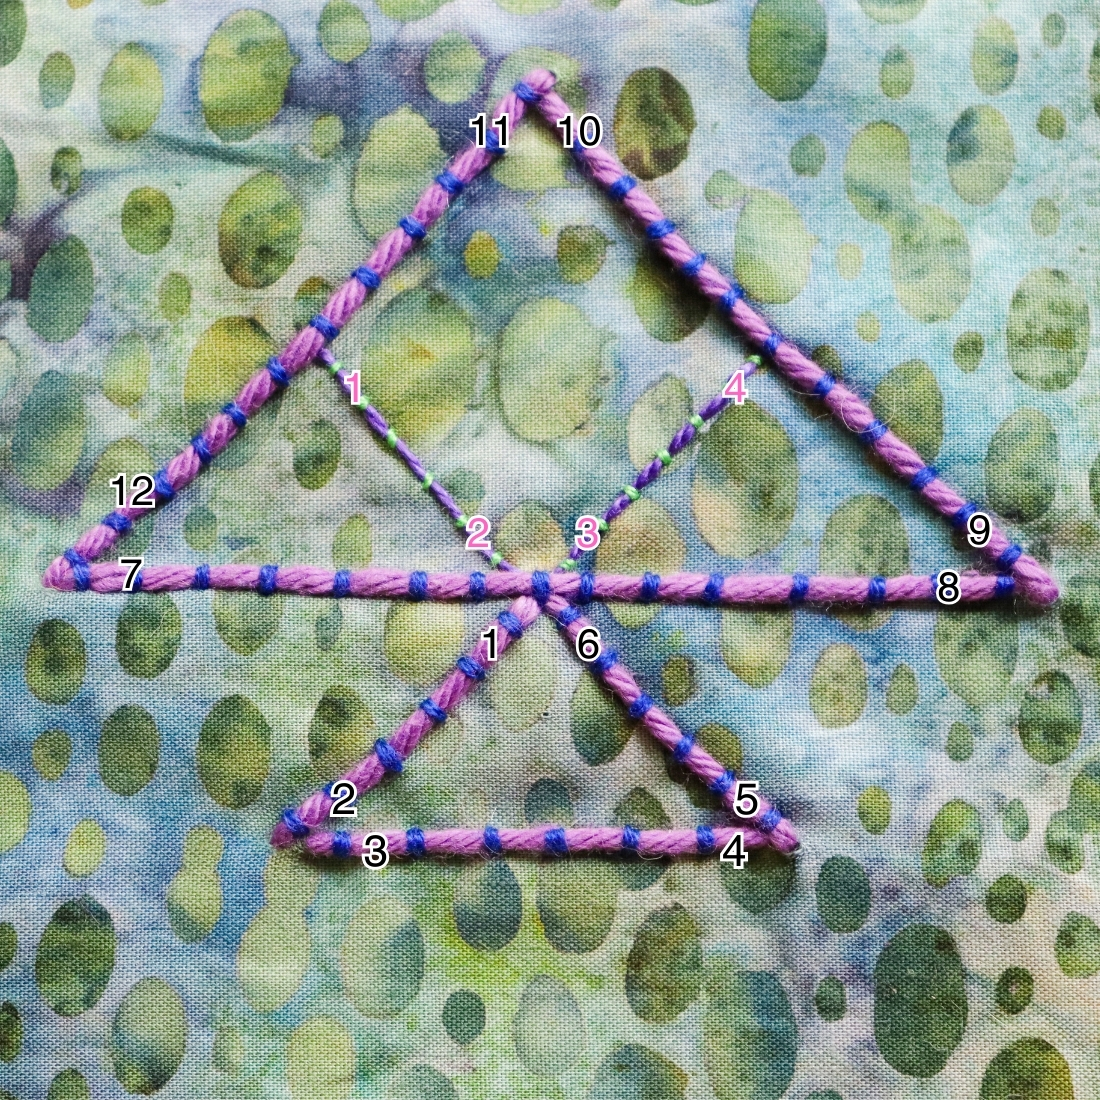
I encourage practice runs to learn what you don’t know yet. I always discover something that will make creating the final version more enjoyable and rewarding if it’s solved ahead of time. For example, with this motif, it was very helpful to map out the stitching route for the laid yarn.
Optional: Template for Motif
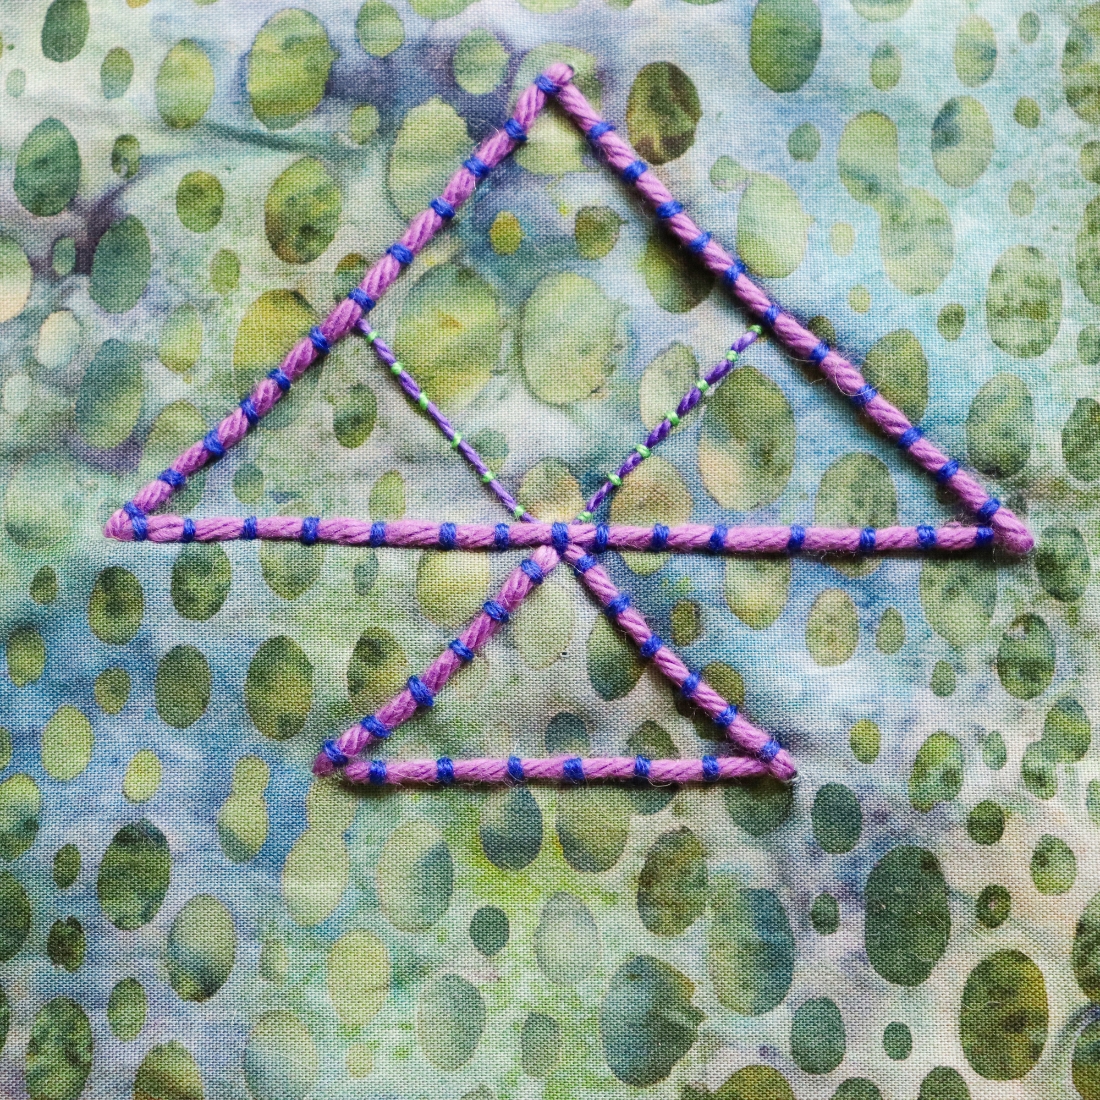
I used templates to create a motif and mark my block for stitching. I used a 2" Half Square Triangle (HST) and a 1" HST template, a ruler, and a marking pencil.
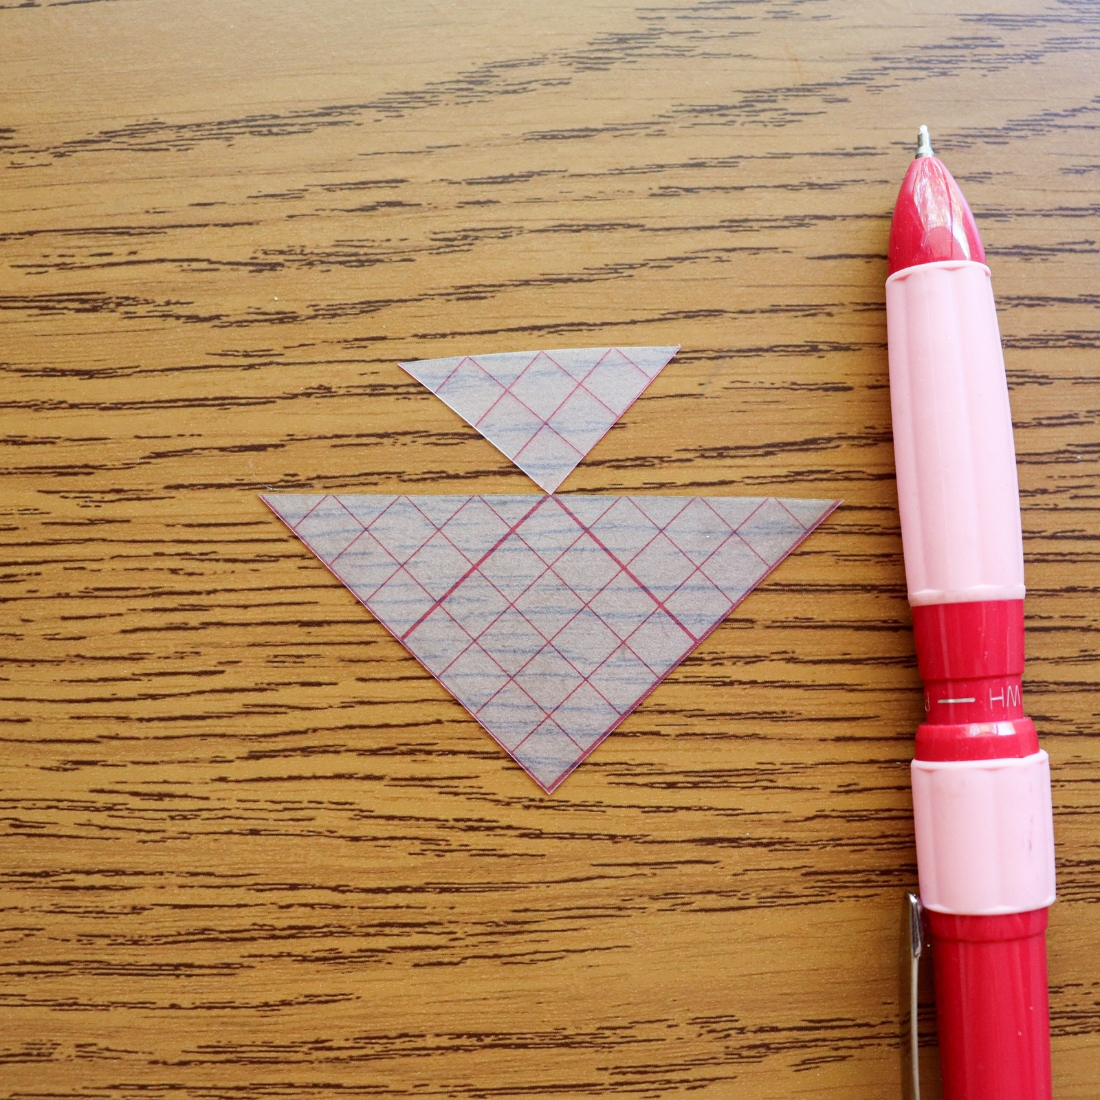
I wanted the long line of the HST to line up with the bottoms of the pink HST to either side of them, so I set my ruler across that line and centered the template using the measurements. Then I marked the corners.
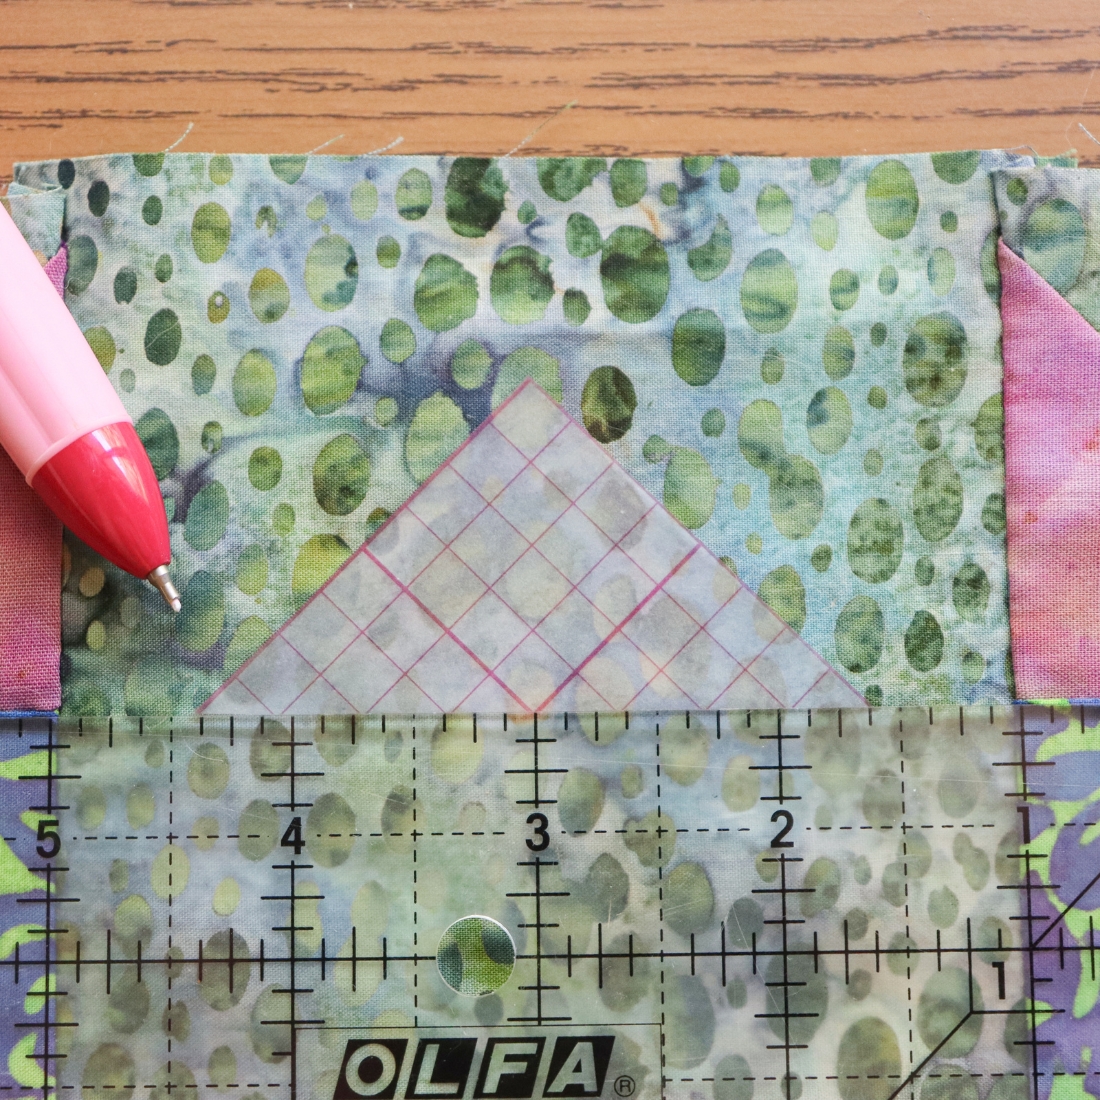
I repeated this with the smaller HST for the tail, using the ruler again to line up straight lines and using the previous mark for alignment.
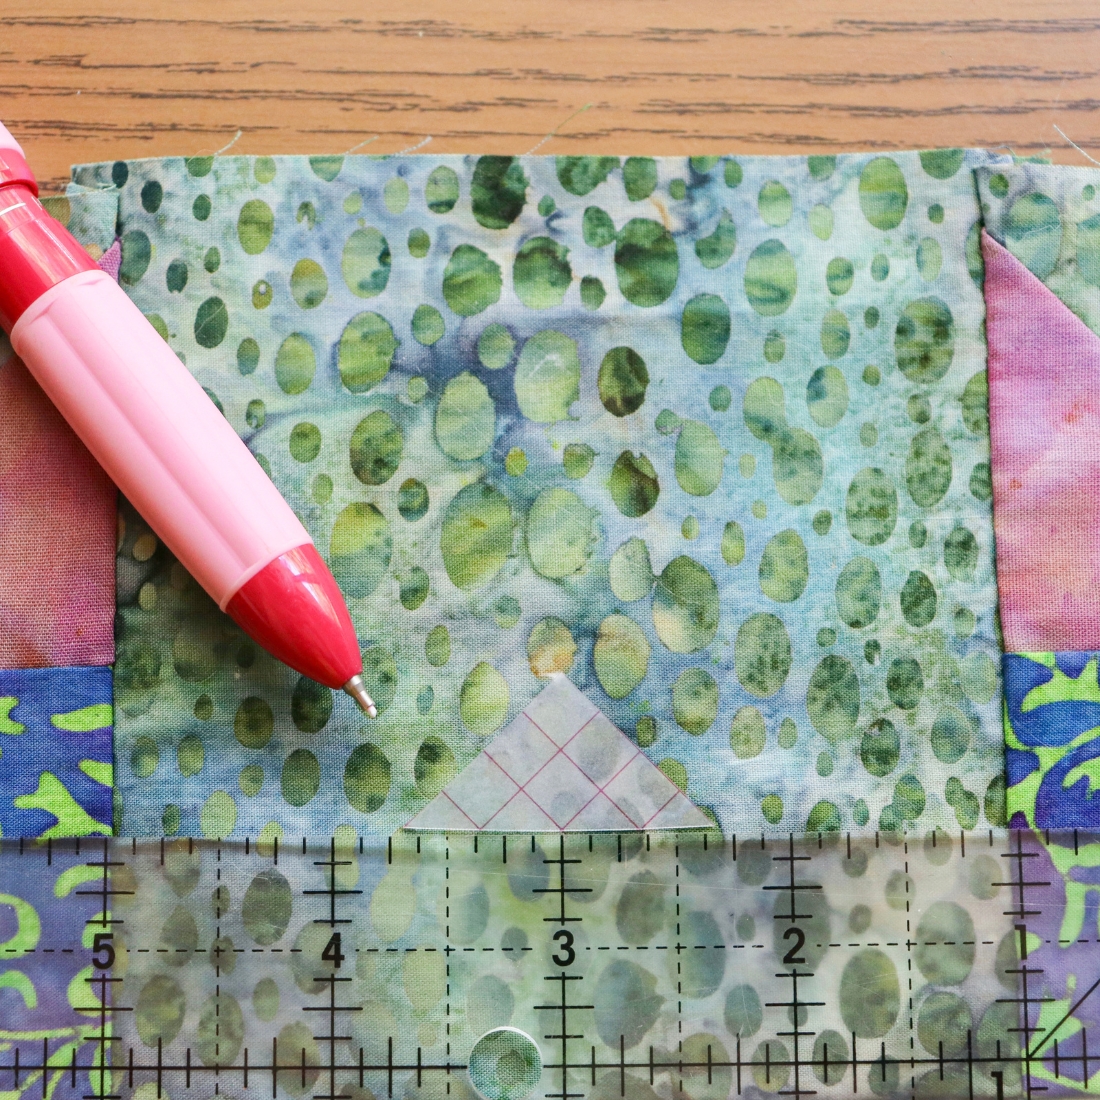
Mark your blocks in any way you like!
How to make the Couching Stitch
Two “threads” are worked using two needles: a laid thread (often thicker), and a couching thread. For this example, a middle-weight cotton yarn is the laid thread, and three strands of embroidery floss held together are the couching thread.
To start, thread and knot the laid thread. Start from the back and take a single stitch from one mark to another.
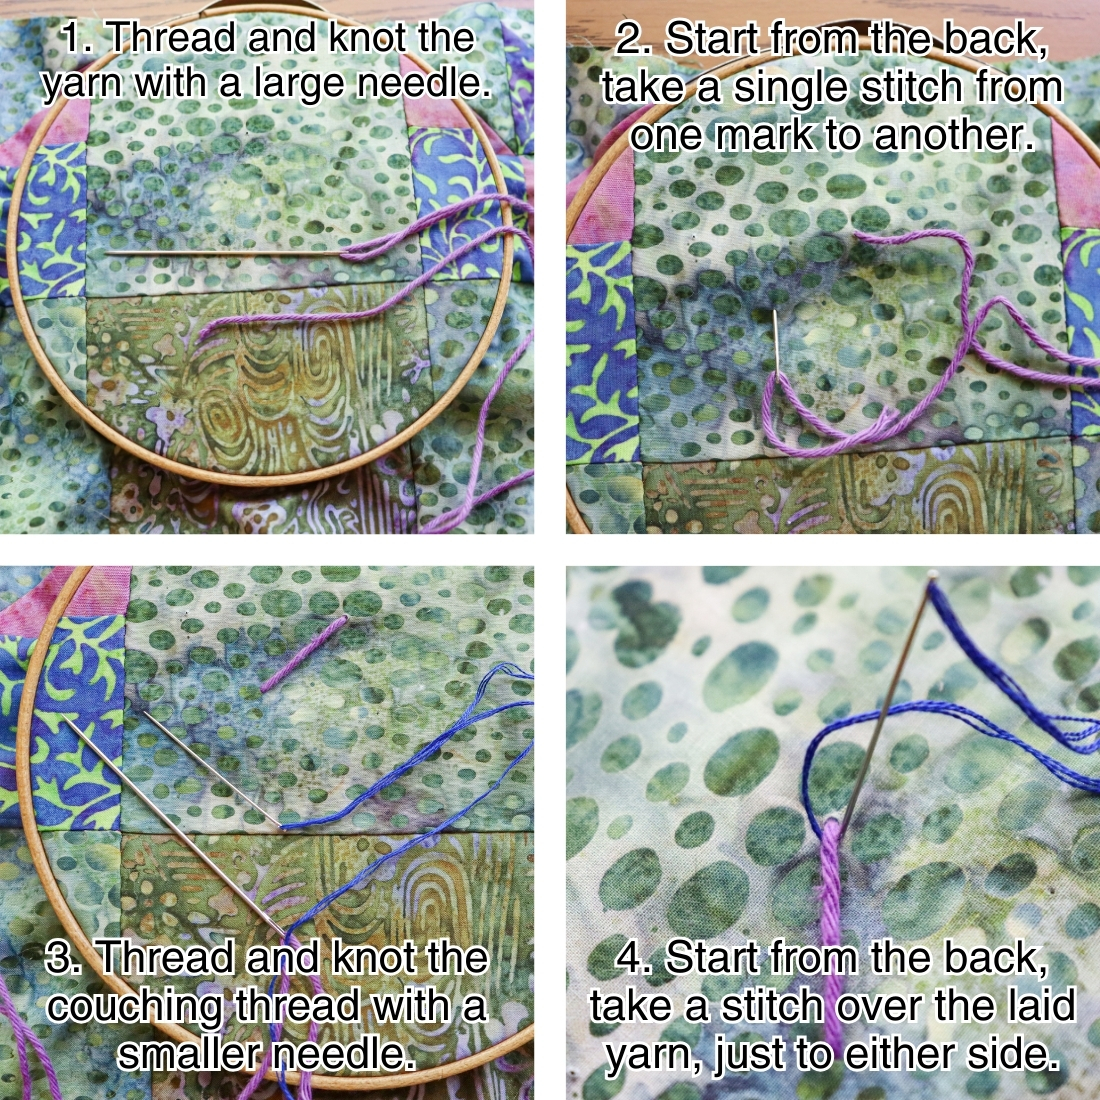
Then thread and knot the couching thread. Start from the back and bring the needle up right next to the laid thread, then over it, bringing the needle down on the opposite side of the laid thread. Pull to take the stitch.
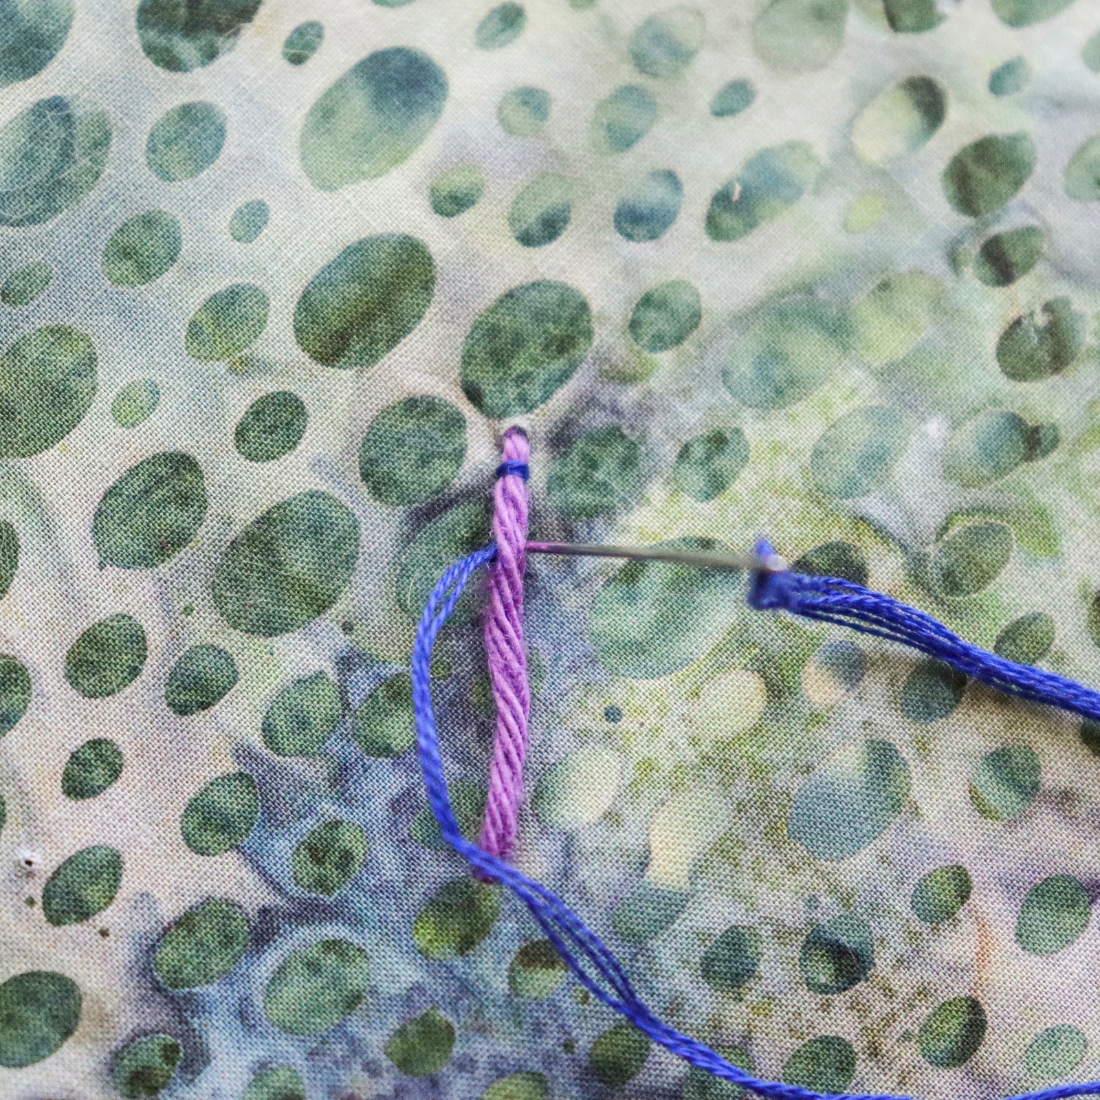
Repeat this couching stitch over the laid thread until it is nearing the end, then take the next large stitch of the laid thread and continue couching. It helps to take the next stitch in the laid thread before finishing the previous stitch’s couching. That way, the couched stitches hold the laid material in its final position and will not be shifted by taking the next stitch of the larger yarn material. Tie off all threads on the back of the work when finished.
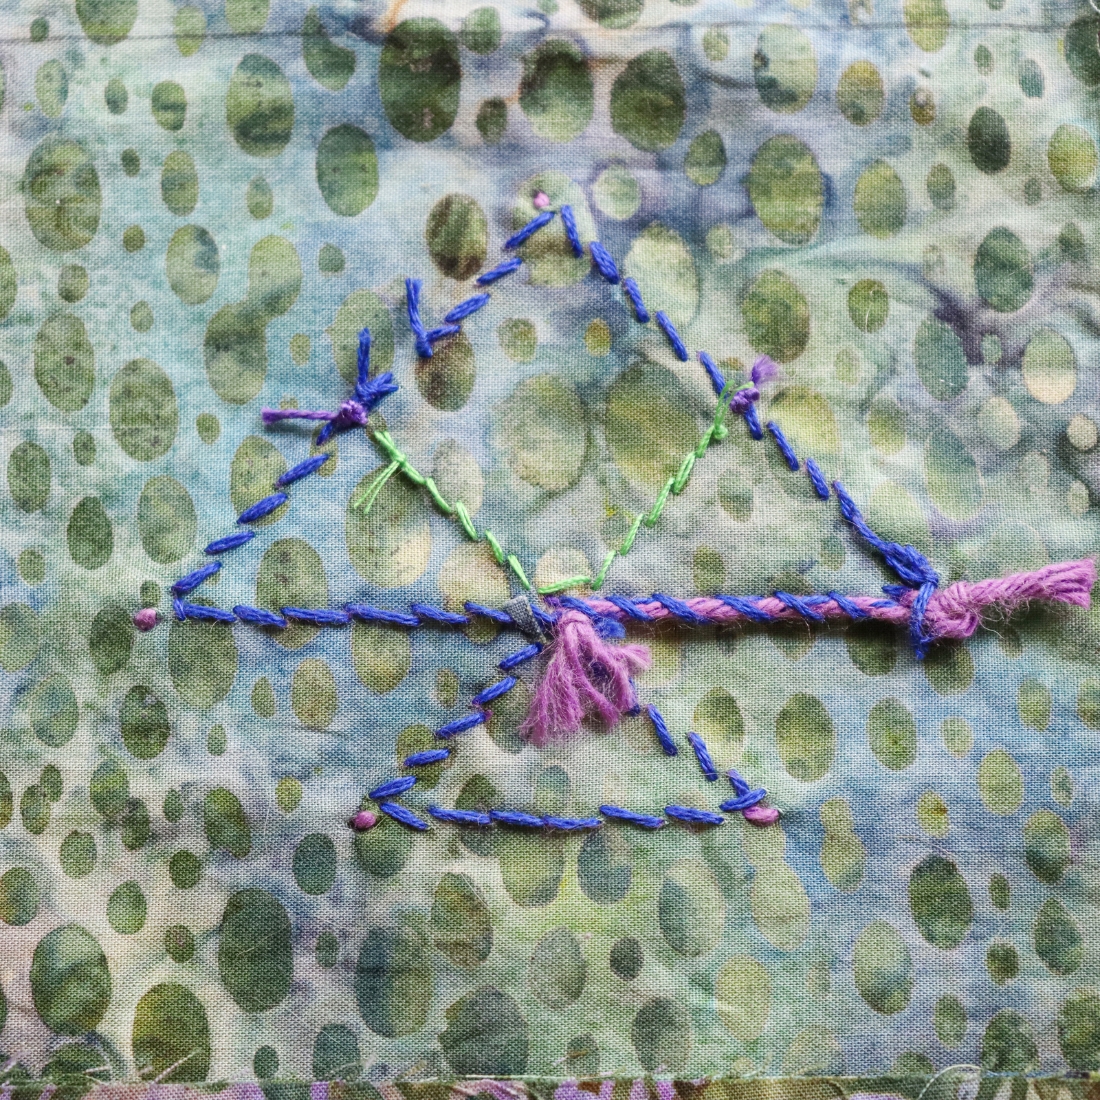
The back shows well that the reverse side of the couching stitch resembles a stem stitch. It also shows how little of the laid material resides on the back, unless part of the motif requires a short jog over.
A few years ago, I made a tutorial showing a very large-scale version of couching using a thick cord and embroidery floss on wool. Follow along there to see the stitch in motion and get a sense of this simplified couching technique that doesn’t hide the tails of the laid material.
Play and explore the versatile couching stitch for yourself!

Be sure to stop by the AQS Quilting Project Parade Group on Facebook to show off your finished blocks.
Next month, beginning September 10, we will make the Dutchman's Puzzle block!
Block Schedule
August: Fish
September: Dutchman's Puzzle
October: Bear Paw
November: Flower Basket
December: Split Back Star


Sign In
Create New Account