AQS Block by Block Basics: Flower Basket Block sponsored by AccuQuilt
- By American Quilter's Society
- Nov 4, 2025

Welcome to the AQS Block by Block Basics Series sponsored by AccuQuilt! Each month, we'll spend three weeks playing with one block.
Week one, we'll kick things off with hand piecing from templates like the quilters of yesterday.
For week two, we'll use the AccuQuilt Cutting System and machine-piece the blocks with a focus on precision piecing.
Finally, in week three, we'll focus on making the block fabulous with a variety of embellishment techniques.
Be sure to join our AQS Quilting Project Parade Facebook Group to sew along with other quilters, ask questions, and share your progress.
If you missed blocks in the series, check them out by clicking the name:
Flower Basket Block
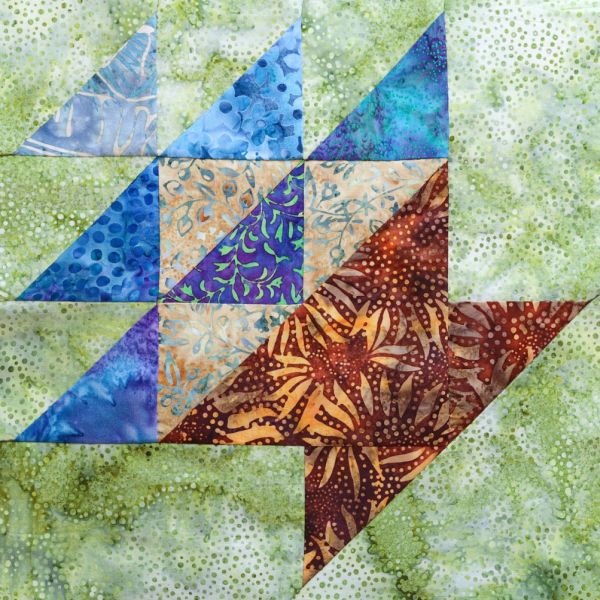
12" x 12" finished block size
Week One: Template cutting and hand piecing
Week Two: AccuQuilt cutting and precision machine piecing
Week Three: Embellishment fun
Each month, we'll complete two blocks, one hand pieced and one machine pieced. You can finish one or both of the blocks to make mini quilts or use them in projects. We'll have lots of creative ideas along the way for using your 12" blocks. We'll also offer finishing instructions if you prefer to save all the blocks for a quilt.
This month’s block, Flower Basket, features Half Square Triangles (HST) as units and as shapes, plus a couple of rectangles. The order in which each part is pieced and a little extra attention to points are the trick to feeling confident with this unique, traditional block. We’ll explore the tips and tricks this week, which build on the hand piecing skills we’ve practiced throughout the year.
“The daylight hours are growing shorter, and the plants I enjoy visiting around the Ozarks are pushing out their last blooms now. Each late blossom has been a delight to see, and so I wanted to pay an homage to the determination of flowering things with this Flower Basket block by using an array of fabrics. While I’ve always enjoyed looking at these kinds of blocks, I must admit, I have not always enjoyed making them by machine. It was a pleasant surprise to find that the hand piecing skills we’ve grown together throughout this series made this the easiest time I’ve ever had piecing a Flower Basket block! If you’ve not hand pieced this kind of block before, I hope you find your joy while making it, just as I did.” -Emily Cross, Ozark Modern Crafting
Week One
Template Options
Follow the steps from our first month (click here to visit the first tutorial) to make the templates needed for this month's block.
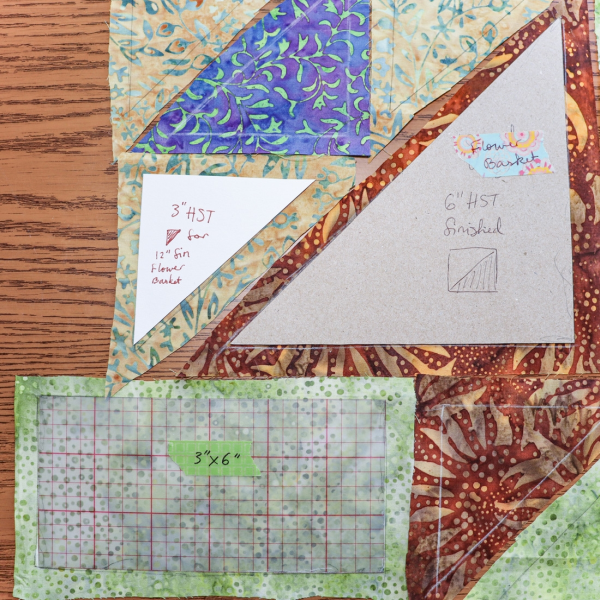
You need the following templates, and note you may have made some of these previously for other blocks in the series:
(1) 6" x 6" square, subcut diagonally once to make a half square triangle (HST)
(1) 3”x 3" square, subcut diagonally once to make a half square triangle (HST)
(1) 3" x 6" rectangle
As noted, you may have equivalent templates from previous months. For example, I used the 6" HST from Jewel Box, the 3" HST from Dutchman’s Puzzle (or Sawtooth Star or Clay’s Choice), and the 3" x 6" rectangle from Uneven Nine-Patch.
Then, following the color layout you like*, mark patches out as listed below:
(2) 6" x 6" HST: one is for the Basket, one is for the Background
(16) 3”x 3" HST: two are for the Basket, six are the Flowers, three are for Contrasting Flowers, and five are for the Background
(2) 3" x 6" rectangle: for the Background
*Note: I decided to add Contrasting Flowers as a design element instead of those patches being from the background fabric. I also used a different fabric for each Flower. Try your own variations!
Remember, these are finished sizes and don't include the seam allowances. Be sure to label your templates so it's easy to find the right size when you need it!
Select your fabric, and start tracing. If last month was your first time hand piecing, you'll have a pretty good idea of how much seam allowance you want.
If this is your first try, here's some important info you shouldn't miss:
Seam allowances are different for hand piecing. They don't serve as a guide for accuracy, rather, they exist so the fabric doesn't fray too much while you sew. If you're new to hand piecing, give yourself some extra room. You can always trim them down later.
Step one: Select the fabrics for the block.
Step two: Trace the template on the backside of the fabric, leaving enough room between the patches for the seam allowances (a 1/4" or so for each patch is preferred for the seam allowance, but it's not a rule for hand piecing - you'll learn what you like best).
Step three: Cut out the patches, leaving enough fabric outside the drawn line for a seam allowance. DO NOT CUT ON THE DRAWN LINE - it's tempting, but don't do it.
Hand Piecing
Previously, we covered the Quilter's Knot, the Tailor's Lock Stitch, and the End Knot. If you missed it, you can catch up here.
To begin, lay out the block using all the marked pieces, as shown below. Use this arrangement when piecing to stay organized.
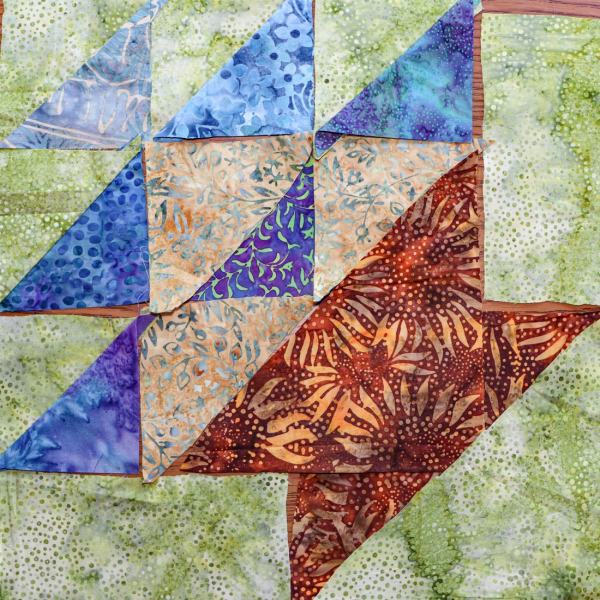
As we piece through the units and then sections, I return to laying out the block through each step to help myself stay oriented, sewing each patch throughout the block.
Hand piecing Flower Basket uses all the same techniques as you used for the previous blocks to create Half Square Triangle units, but it goes a step further in how HST shapes are added throughout. Let’s start with the HST units.
Half Square Triangle Units
Line up the half square triangle patches right sides together and pin. Take care not to stretch the material too much across the bias of the fabric.
Sew a 1/4" seam from corner to corner. Remember, take care not to sew into the seam allowances, just corner to corner. Trim your seam allowances if you, like me, prefer to piece biases with a wider allowance but want all the seams the same size at the end for neatness.
Finger press the HST unit. The unit measures 3½" x 3½" square, unfinished. Repeat to make 6 HST units. Note that there will be two HST shapes from the Contrasting Flower fabric, which will be used in the next step.
Contrasting Flowers and Basket Assembly
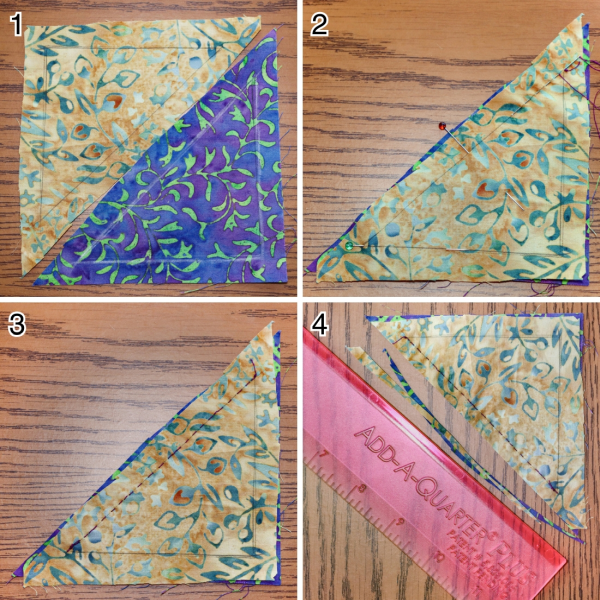
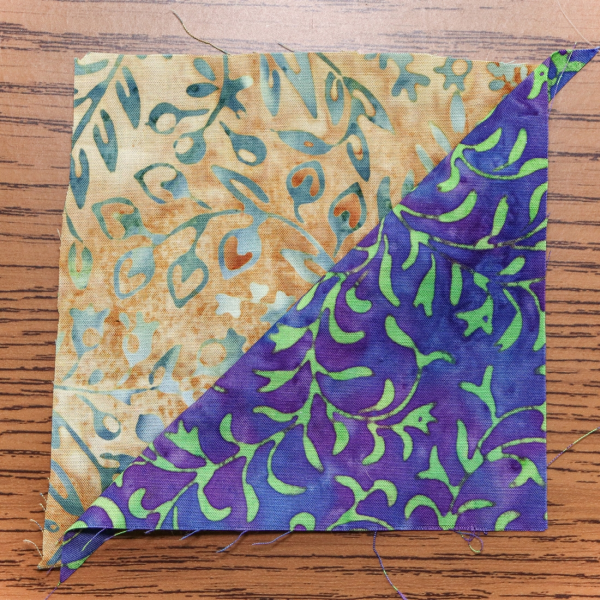
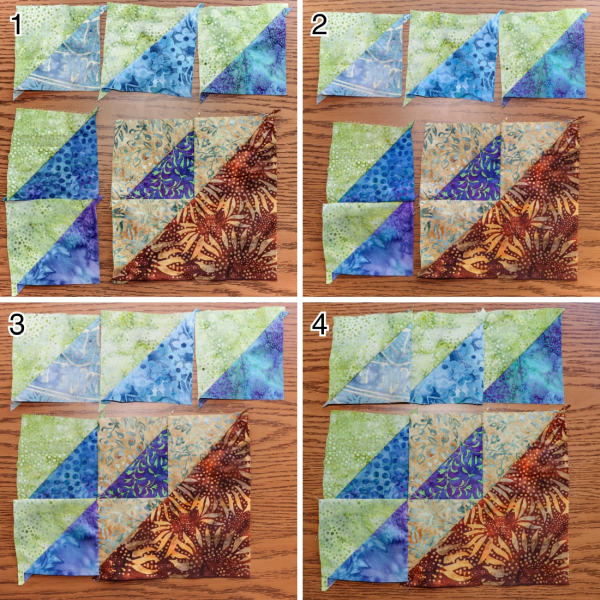
Using your block layout as a guide, arrange one HST unit and two HST shapes from the Contrasting Flower fabrics, and the large HST shape from the Basket fabric, as shown in picture 1.
Layer the HST unit with a Contrasting Flower HST shape patch right sides together and sew a 1/4" seam, as shown in picture 2. Finger press, if desired.
Repeat with the other Contrasting Flower HST shape patch, as shown in pictures 3 and 4.
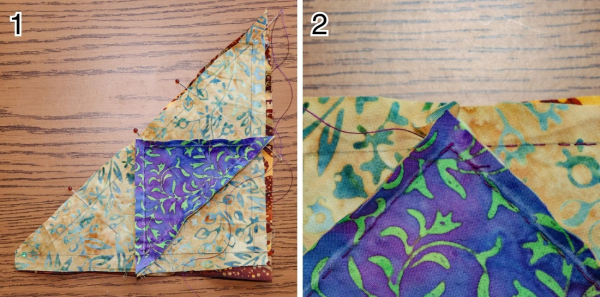
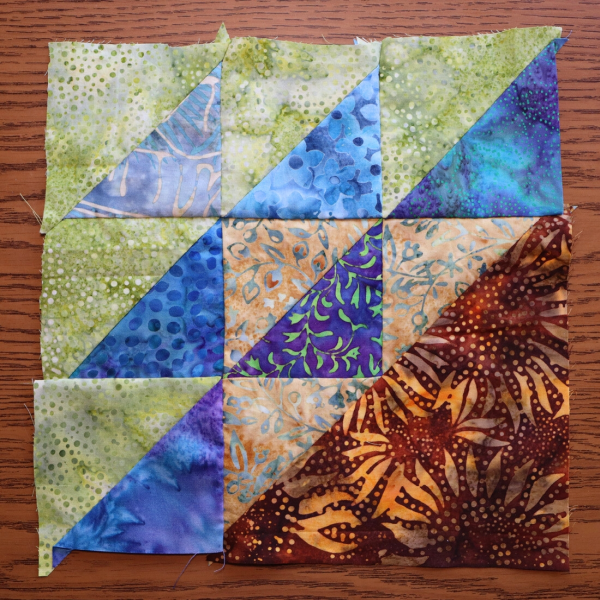
Layer the pieced section with the Basket HST shape, right sides together, and sew a 1/4" seam. Make sure to pass through the seam intersections* for a crisp point.
Notice in picture 2 that there are no stitches from this seam through the purple Flower fabric, only the yellow Contrasting Flower fabric.
*Below is a refresher on how to pass through the seam when hand piecing.
Passing Through the Seam
Step one: When you come to a seam, take a back stitch on the marked line, right up to the seam.
Step two: Pass the needle through the seam on the same side you are stitching from, above the seam's stitches. If you pass the needle below the seam's stitches, your stitch will show on the front of your block.
Step three: Once on the other side of the seam, take a stitch forward and then backstitch over this stitch to continue.
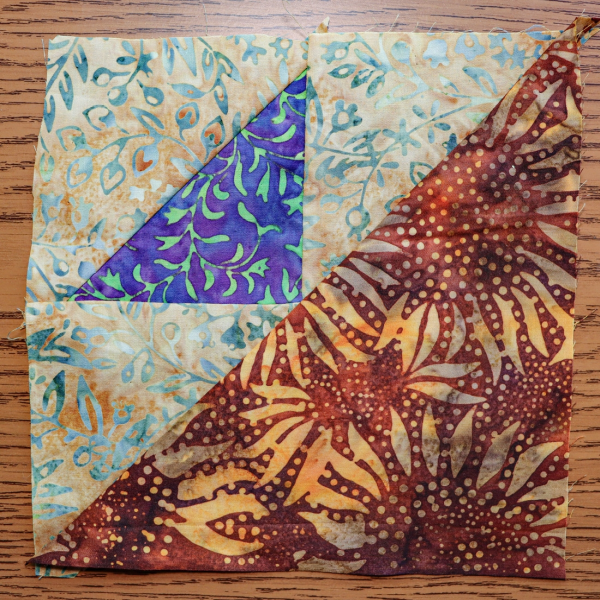
This section of the block measures 6" x 6" finished, which you can measure from the back following the marked lines, if desired.
TIP: I found checking the finished size throughout piecing this block to be more useful than checking unfinished sizes, due to using ⅜" (ish) seam allowances. I used wider allowances than the usual quarter inch because of to how many bias edges are sewn together in this block. Please use your comfort level and discernment as your guide when it comes to accuracy!
Add the Flower HST Units
The next things to add to the block are the remaining Flower HST units.
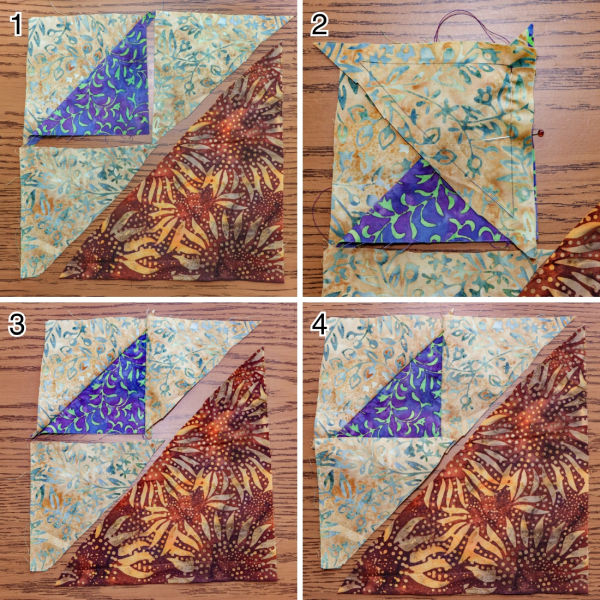
Lay the block back out so there is a row of 3 HST units, a pair of 2 HST units stacked, and the Contrasting Flowers/Basket from the previous step, as shown in picture 1.
Sew the stacked pair of HST together, as shown in picture 2.
Sew the stacked pair of HST to the Contrasting Flowers/Basket unit, as shown in picture 3. Make sure to pass through seam intersections.
Sew together the three HST units, as shown in picture 4.
Sew the row of Flower HST to the block center, as pictured. Make sure to pass through seam intersections. The Block Center now measures 9" x 9" finished.
Assemble and add the Basket Feet
The next things to add are the Background rectangles and the smaller Basket HST shapes, which I refer to as Basket Feet.
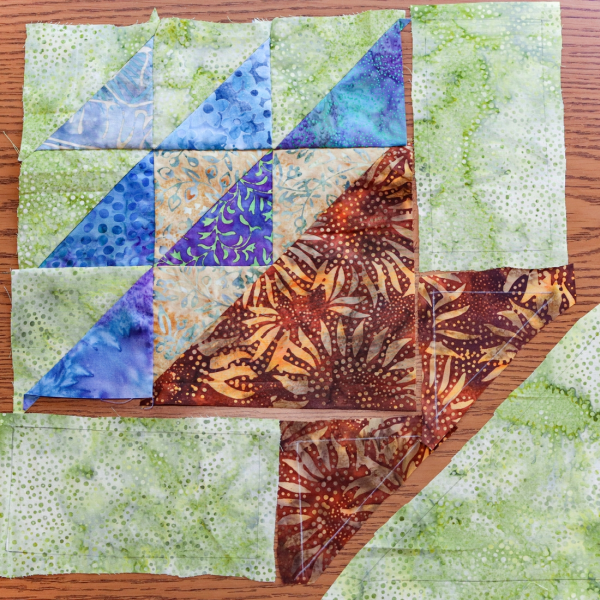
Remember to lay the block back out for clarity about the Basket Feet orientation through the next steps.

Sew a Basket Feet HST shape to a Background Rectangle, as shown in picture 1. Repeat on the other side as shown in picture 2.
Layer the Basket Feet sides with the Block Center and sew, as shown in pictures 3 and 4.
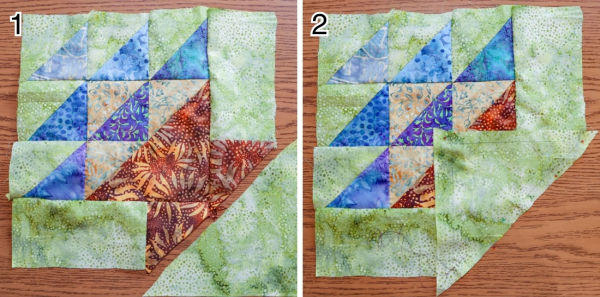
Sew the remaining Basket Feet side to the Block Center, as shown in picture 1.
Layer the Background 6" HST right sides together with the rest of the block and sew from marked corner to corner. Make sure to pass through the seam intersection.

Flower Basket block measures 12½" x 12½" square, unfinished.
Be sure to join us in December as we sew Split Back Star blocks three ways!
Block Schedule
November: Flower Basket
December: Split Back Star


Sign In
Create New Account